


The promise of PKM is that by connecting things, you can get more creative insight out of your notes and ideas. But this promise often goes unfulfilled, leaving many people discouraged. But there's always a reason, and the reason isn't because you're bad at note-taking.
You're probably just missing a crucial step in the sensemaking process. One that transforms scattered thoughts into the breakthrough insights you're after.
That missing piece? Mind mapping.
Mind mapping isn't just another productivity technique for visual thinkers. It's the thing that can unlock the full potential of the notes and ideas already sitting in your PKM system. In this post, I'll show you exactly how I use mind mapping as the creative engine that keeps my creativity flywheel spinning, and teach you how you can use this powerful ideation technique yourself to develop the ideas that are in your PKM system so you can get more out of them and FINALLY make the unfulfilled promise of PKM a reality.
What Exactly Is a Mind Map?
At its core, a mind map is a visual diagram that organizes information around a central concept. It uses a non-linear, radial structure where main ideas branch out from the center and are further divided into related subtopics.
And while you may have seen complex mind maps packed with information, even basic mind maps can provide immense value.
Mind maps can be created on paper or digitally, and the process is straightforward:
- Place your main idea or subject in the center
- Draw lines out from your main idea with related or supporting concepts (these are called nodes)
- Continue adding more nodes and details as you think of them
- Make connections between related nodes by drawing arrows between them
If you're using a digital mind mapping app, these nodes typically have different colors to make it easier to differentiate between branches and organize your thinking.
Linear Thinking vs. Radiant Thinking
I get asked frequently if I use Obsidian for mind mapping. And the short answer is no. Obsidian is great as an outliner, but even with Canvas and community plugins, it's not really a mind mapping app.
To really comprehend why, you need to first understand the difference between linear and radiant thinking.
An example of linear thinking is an outline. Linear thinking is what we were taught in school, and is defined by the following characteristics:
- Word-based (i.e., plain text)
- Monochrome (color isn't used much, if at all)
- Contains listed logic (i.e., hierarchical outlines, either ordered or unordered)
- Is sequential (follows a specific pattern from beginning to end)
- Is one-dimensional
Contrast that with the characteristics of radiant thinking (used for mind mapping):
- Multi-faceted (will use text and images)
- Colorful (used for organizing and grouping ideas)
- Allows for associated logic (i.e., links between related ideas or concepts)
- Non-sequential (any idea can appear anywhere)
- Is multi-dimensional (uses space strategically to organize ideas)
As a result, linear thinking tends to be pretty restrictive, and radiant thinking tends to be a bit more imaginative. The constraints of linear thinking can be useful when writing, but when ideating, you need to think outside the box.
This might be why some people mistakenly associate radiant thinking purely with right-brain creative types, while traditional linear thinking, with its word-based outlines and sequential logic, gets associated with analytical left-brain thinking.
But if you want to tap into your full creative potential, you need to be able to switch back and forth between both modes of thinking. You might naturally lean toward one style, but being able to flip the switch is essential if you want to make more of your notes and ideas.
As someone who's naturally an analytical thinker, traditional linear thinking formats (i.e., outlines) are more comfortable for me. Mind mapping was difficult for me at first, but over the years, I've learned to become proficient at it, and I now consider it an indispensable part of my creativity workflow.
The trick, though, is to use the right app the right way at the right time in the creative process.
Where Mind Mapping Fits in My Creativity Workflow
Personal knowledge management isn't about a single app like Obsidian. It's about how the different apps that you use fit together in your workflows to facilitate the flow of information into and out of your PKM system.
I have a 5-step framework I use for developing my ideas that I call The Creativity Flywheel.
- Capture
- Curate
- Cultivate (this is where mind mapping comes in)
- Connect
- Create
Having an output is critical for making sense of things, but mind mapping is just as important for developing your ideas.
By mind mapping in my preferred mind mapping app (MindNode), I can explore my ideas and develop them so I can see them more clearly for what they really are. There's a famous quote:
"If I had 6 hours to chop down a tree I'd spend the first 4 sharpening the ax." - attributed to Abraham Lincoln
Well, mind mapping is sharpening the mental axe for me. In fact, I estimate that every hour I spend mind mapping in MindNode saves me two hours by the time I sit down to write in Obsidian.
Think of mind mapping as an effective tool you can deploy whenever you feel stuck. When you encounter a mental squeeze point and you're not sure what to do with an idea, mind mapping can help you see what you really have and make sense of it. This makes mind mapping a vital part of the sensemaking process, forcing your brain into a different mode where it considers things from a fresh perspective.
Regardless of whether you consider yourself an outliner or a visual thinker, I encourage you to try mind mapping and see if it doesn't unlock another level of creativity for you. The simple act of switching from a linear to a radial format can help you see connections and possibilities you might otherwise miss.
Just make sure you use the right tool for the job, because it's not about choosing an app based on how your brain is naturally wired. It's about changing your perspective to unlock the creative power inside your notes and ideas. And to do that, you need to use both linear and radiant thinking. I use different apps as a mode switch to help me go back and forth between these modes at different points in the creative process, where MindNode helps me figure out what an idea is, and Obsidian helps me codify my thinking by writing about it.
The Laws of Mind Mapping
So what exactly is a mind mapping app?
According to Tony Buzan, author of Mind Map Mastery and considered by many to be the Godfather of mind mapping, there are specific requirements for a mind map. In order for an app to be considered a true mind mapping app, it must meet all these requirements. Here are his 10 laws of mind mapping:
- Always start with a blank canvas
- Draw a picture or place the main idea in the center
- Use images, symbols, and codes throughout your mind map to communicate ideas
- Select keywords and capitalize them for emphasis
- Place each word or image on its own branch
- Radiate your branches out from the center so your mind map is roughly balanced
- Keep the branches roughly the same length
- Use colors throughout your mind map to group things together
- Use arrows and connecting lines for emphasis
- Aim for clarity with how you position your nodes
While I'm not quite as particular about these requirements as Tony Buzan was, it's easy to see how a dedicated mind mapping app is much better suited for radiant visual thinking than Obsidian is. And while the Canvas core plugin can be used to make something that looks like a mind map, it requires much more effort and really isn't the right tool for the job. It's more of a diagramming app with an infinite canvas than it is a mind mapping app.
To illustrate, let's walk through creating a real basic mind map using MindNode.
How to Make a Mind Map
MindNode is my favorite mind mapping app because it has a beautiful UI that stays out of your way and helps you focus on the information you want to see. It's got all the power you need while still being incredibly easy to use, and strikes the perfect balance between form and function.
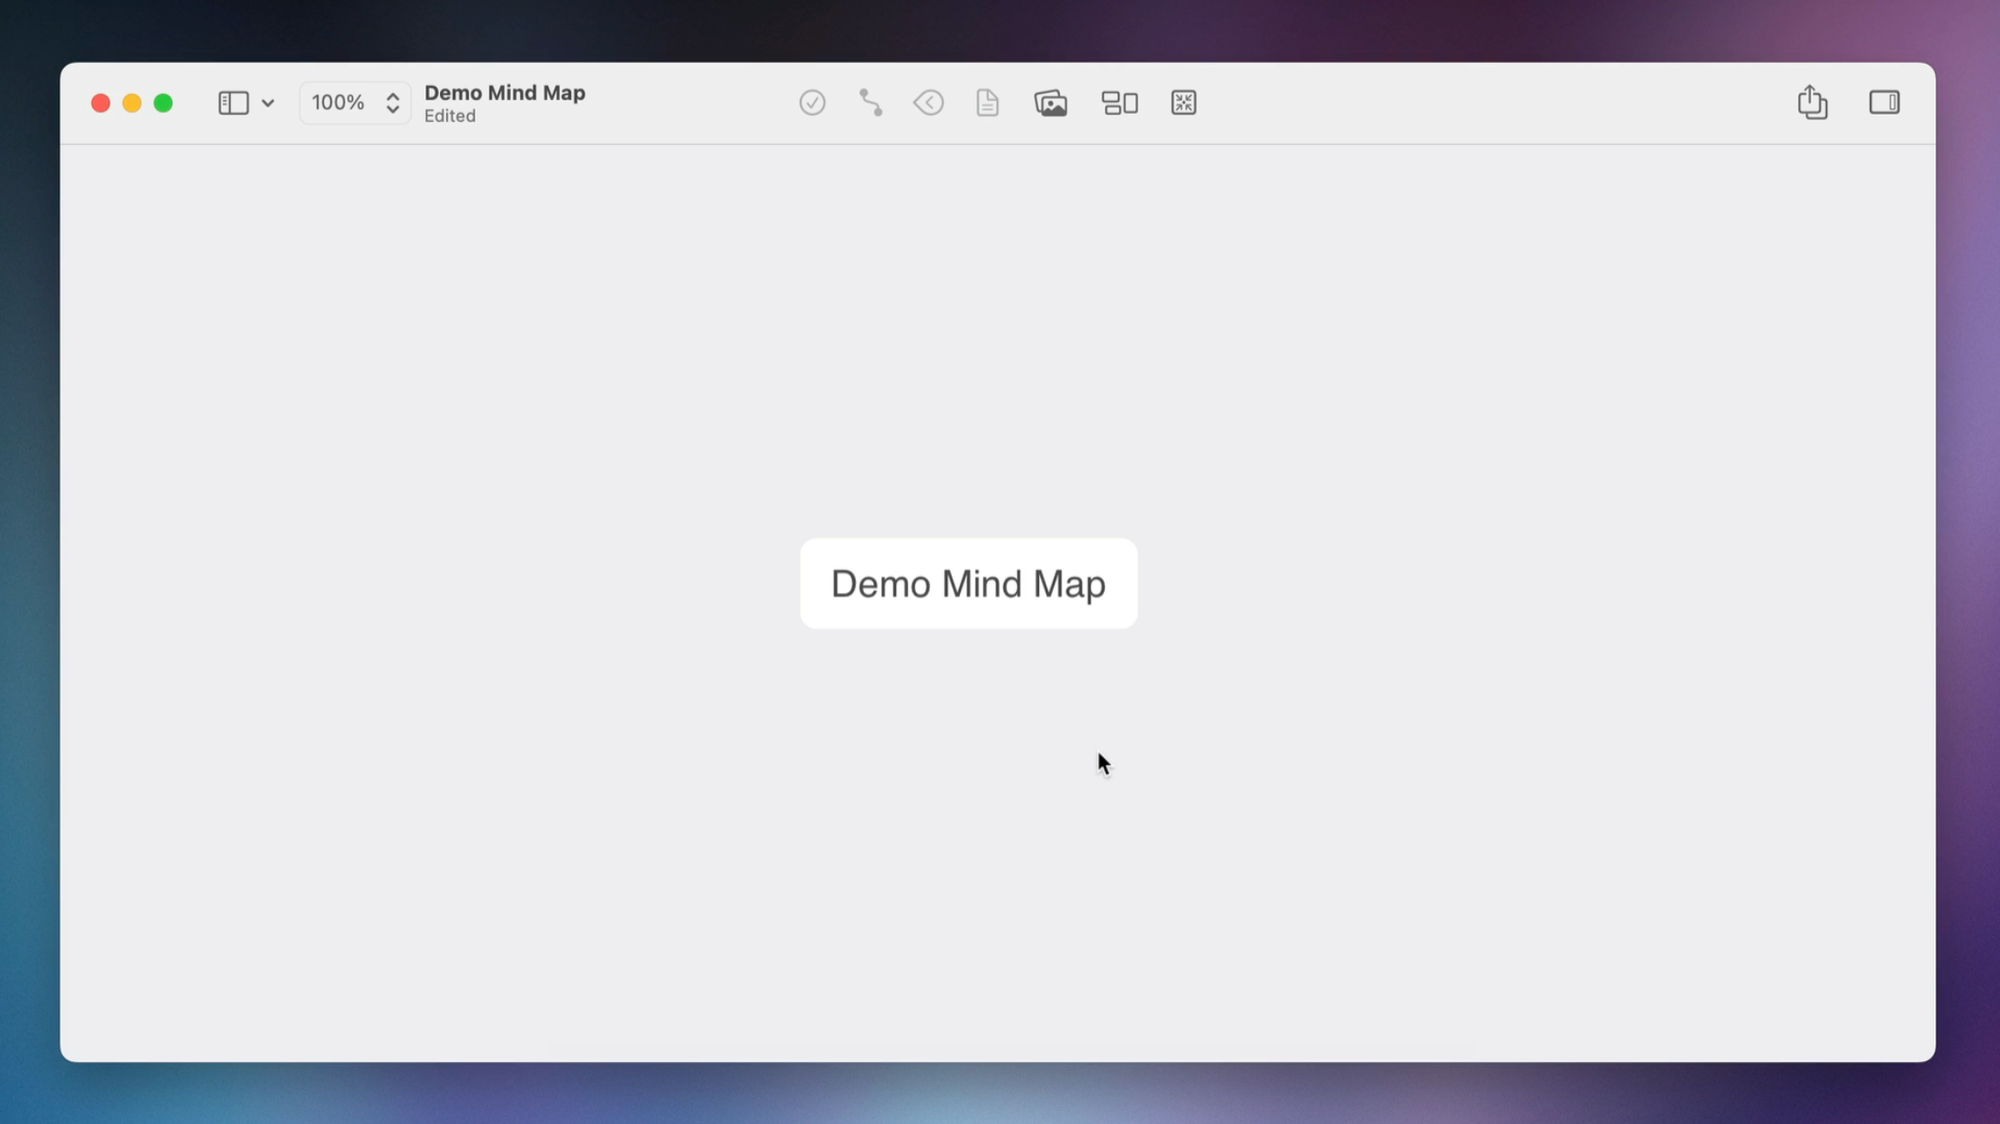
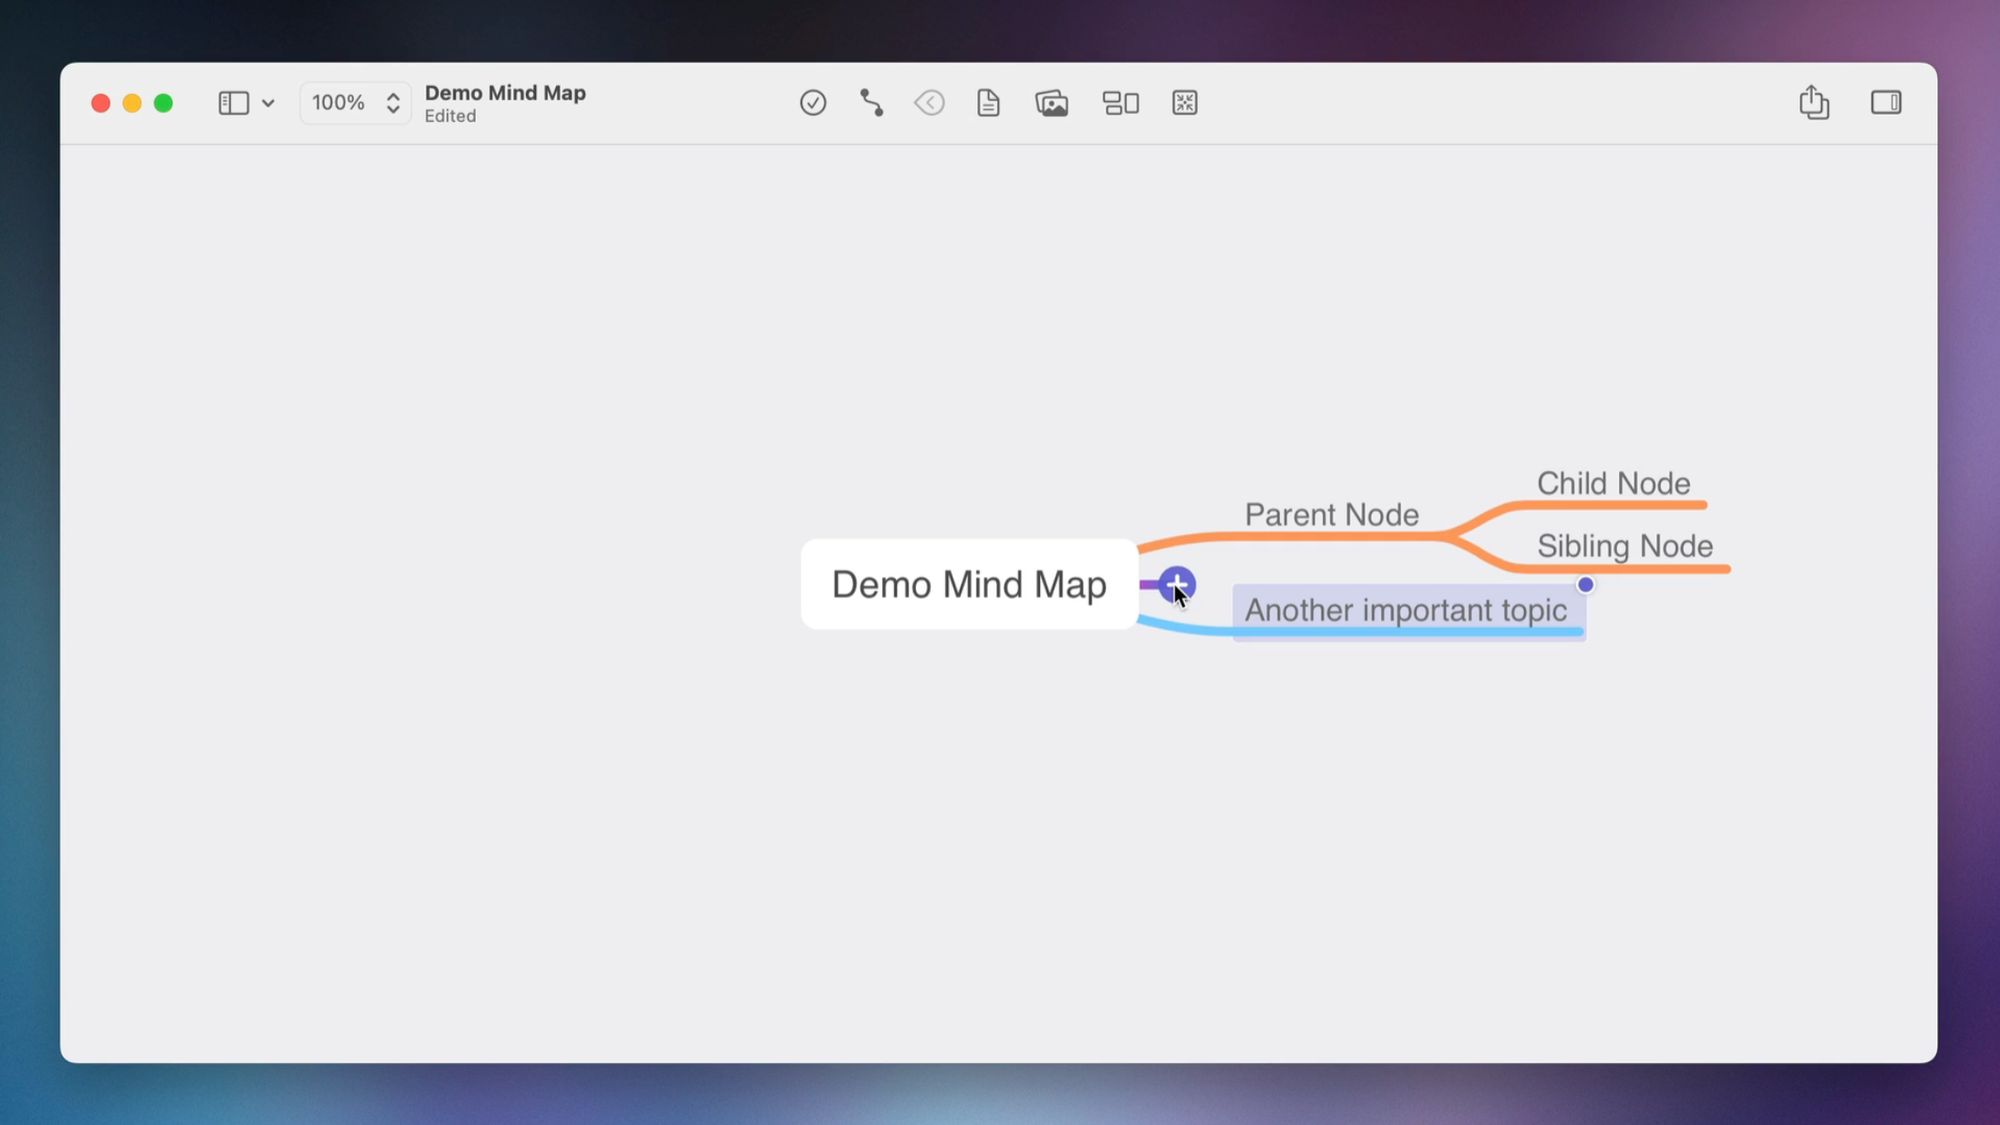
When you create a new mind map in MindNode, it places a main node in the middle and asks you to name it. In this example, let's name our main node "Demo mind map."
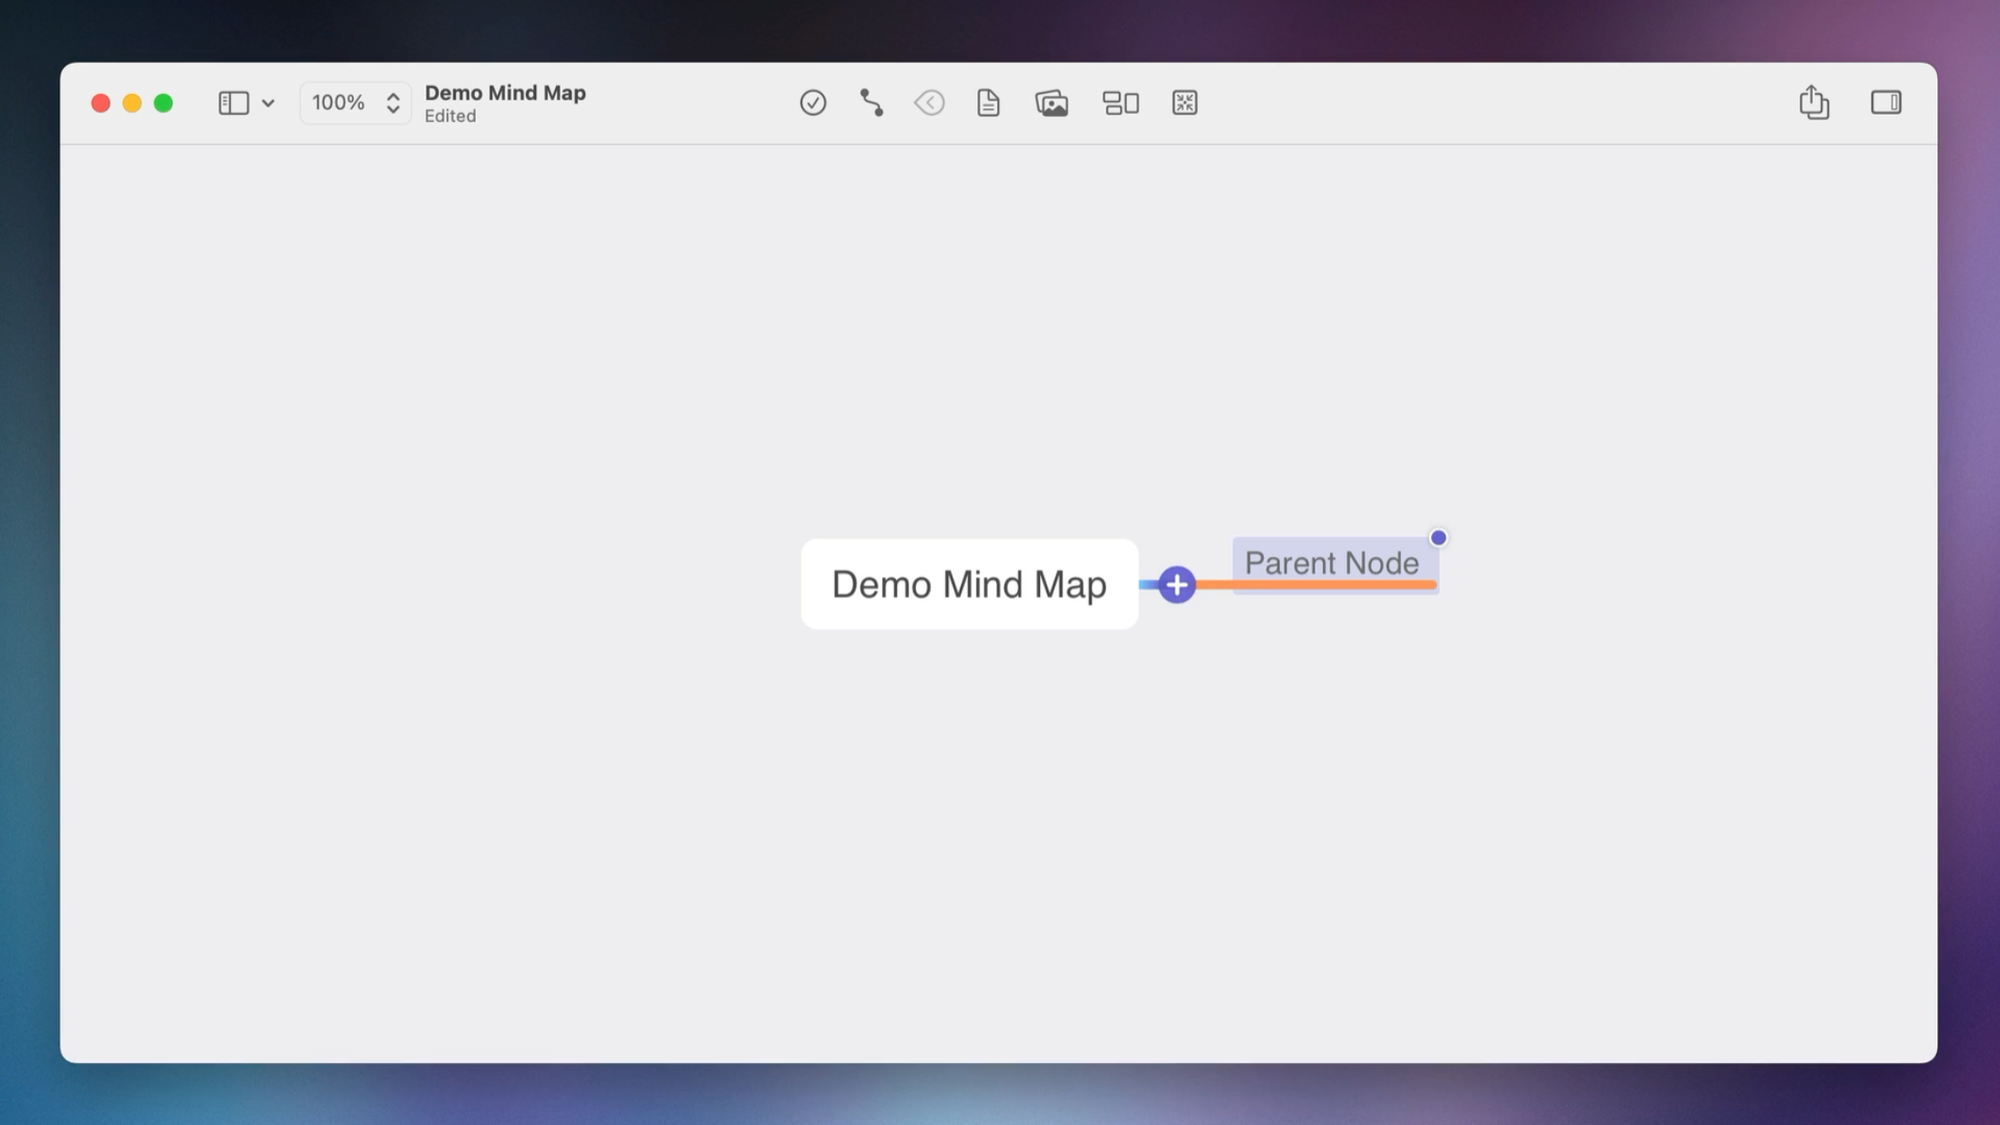
Next, we'll add our first node. With MindNode, you can hover over the main node and click the + to create a new node, which we'll call "Parent node."
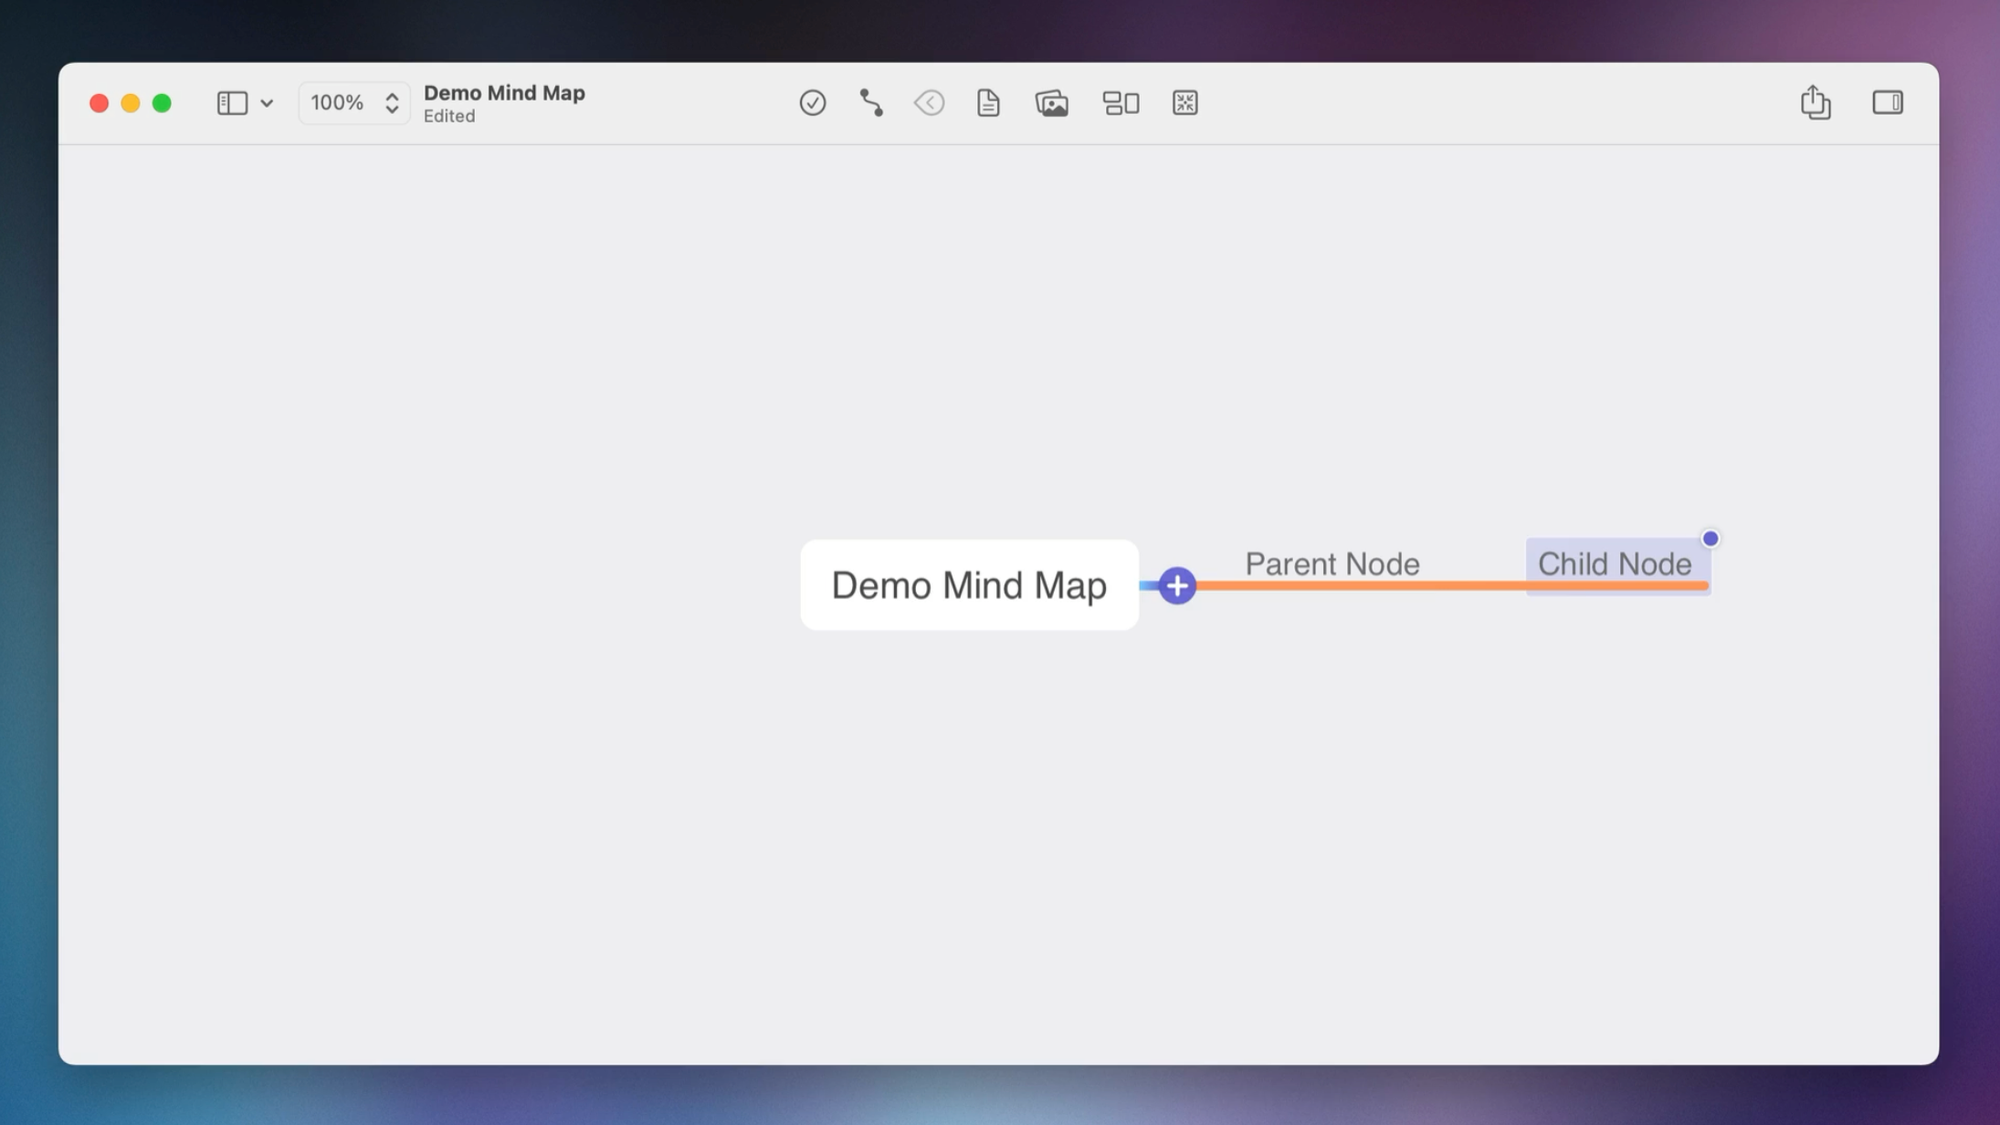
Underneath this parent mode, we can create additional nodes by hitting the Tab key and typing the name of the node. In this case, it's a child node (which is a level lower than the parent node), so we'll call this "Child node."
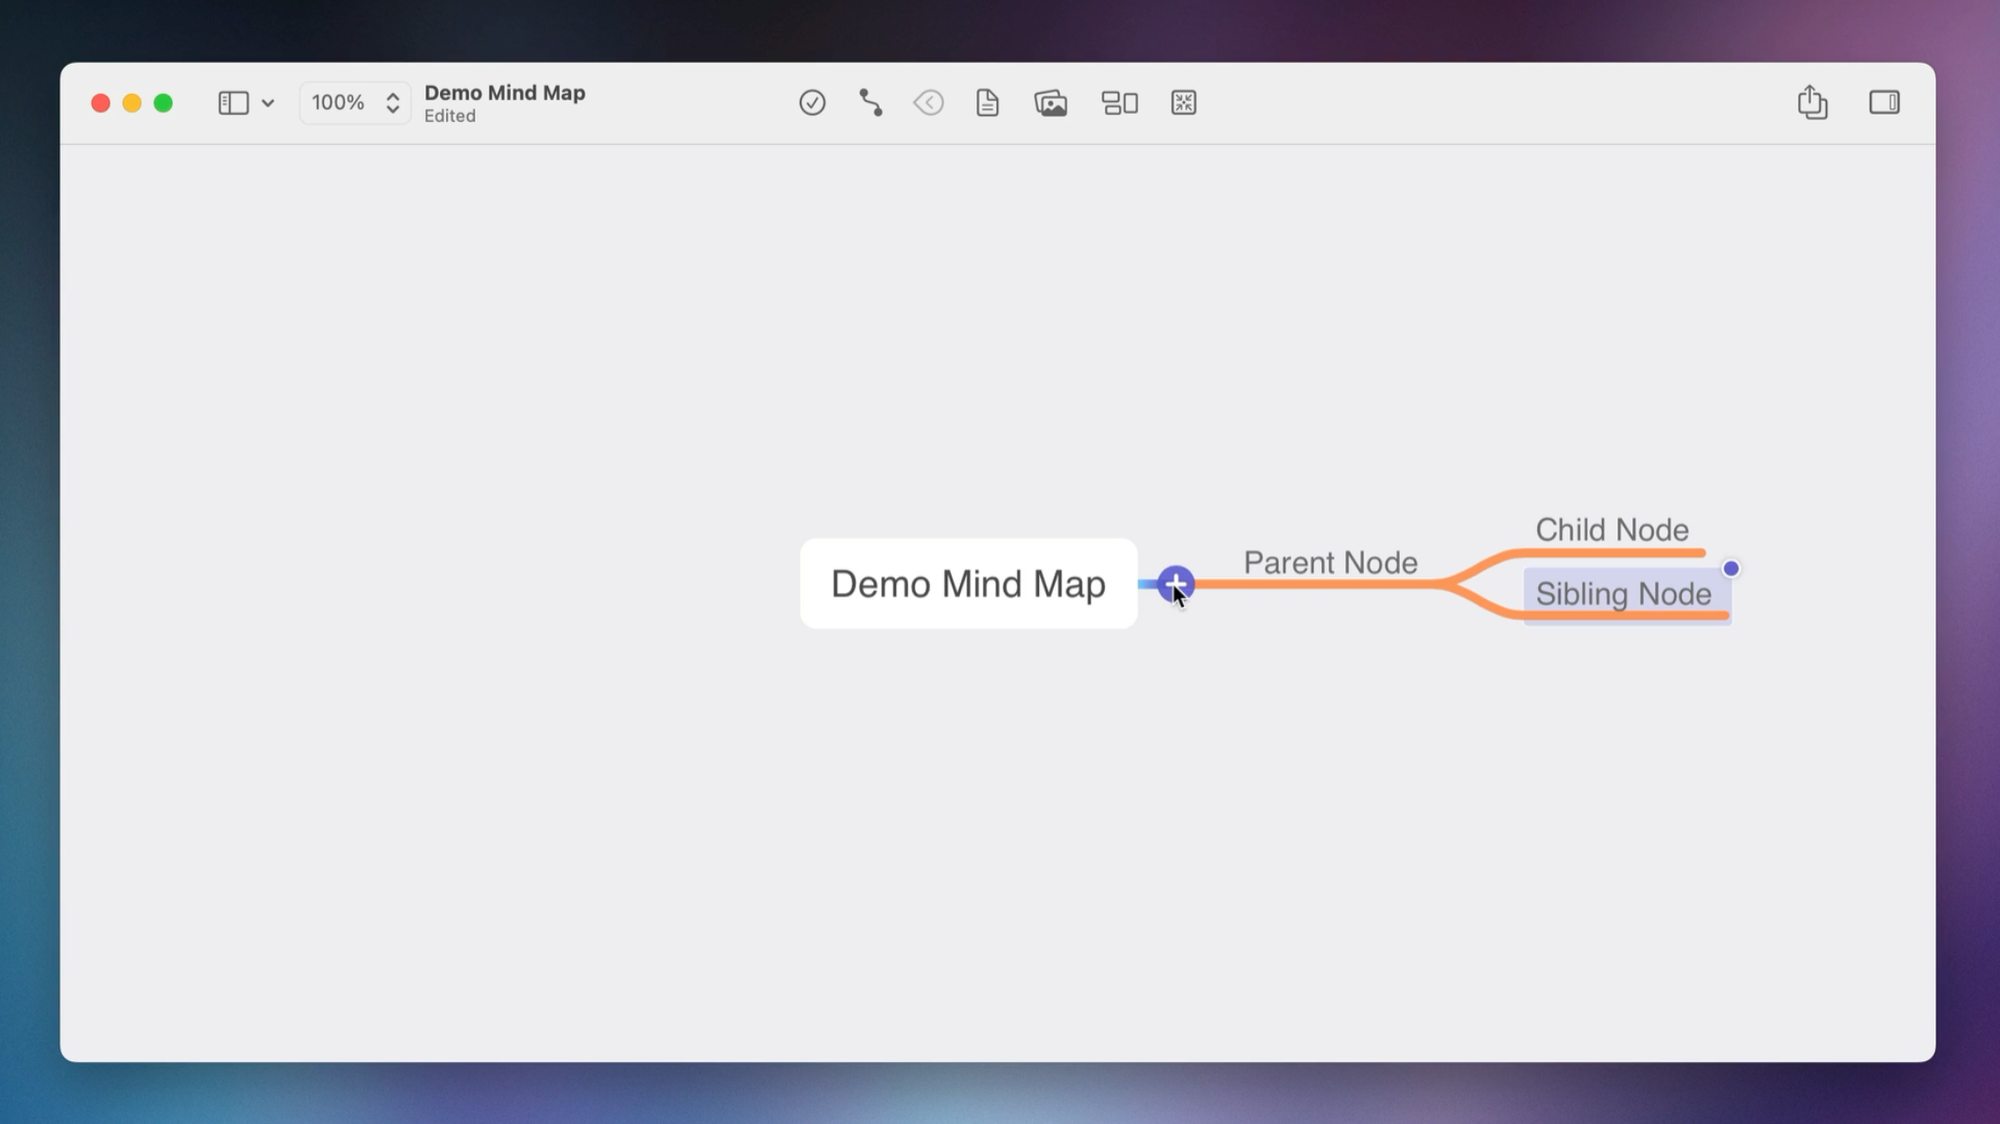
We can also add a node at the same hierarchical level as the current node by hitting the Enter key to create a "sibling node."
Notice how all of our nodes so far are orange and part of the same branch, so let's create a new blue branch from the main node so we can easily distinguish between the two branches. Typically, we'll create new branches like this when we have other important topics to add to our mind map, so let's call this new node "Another important topic."
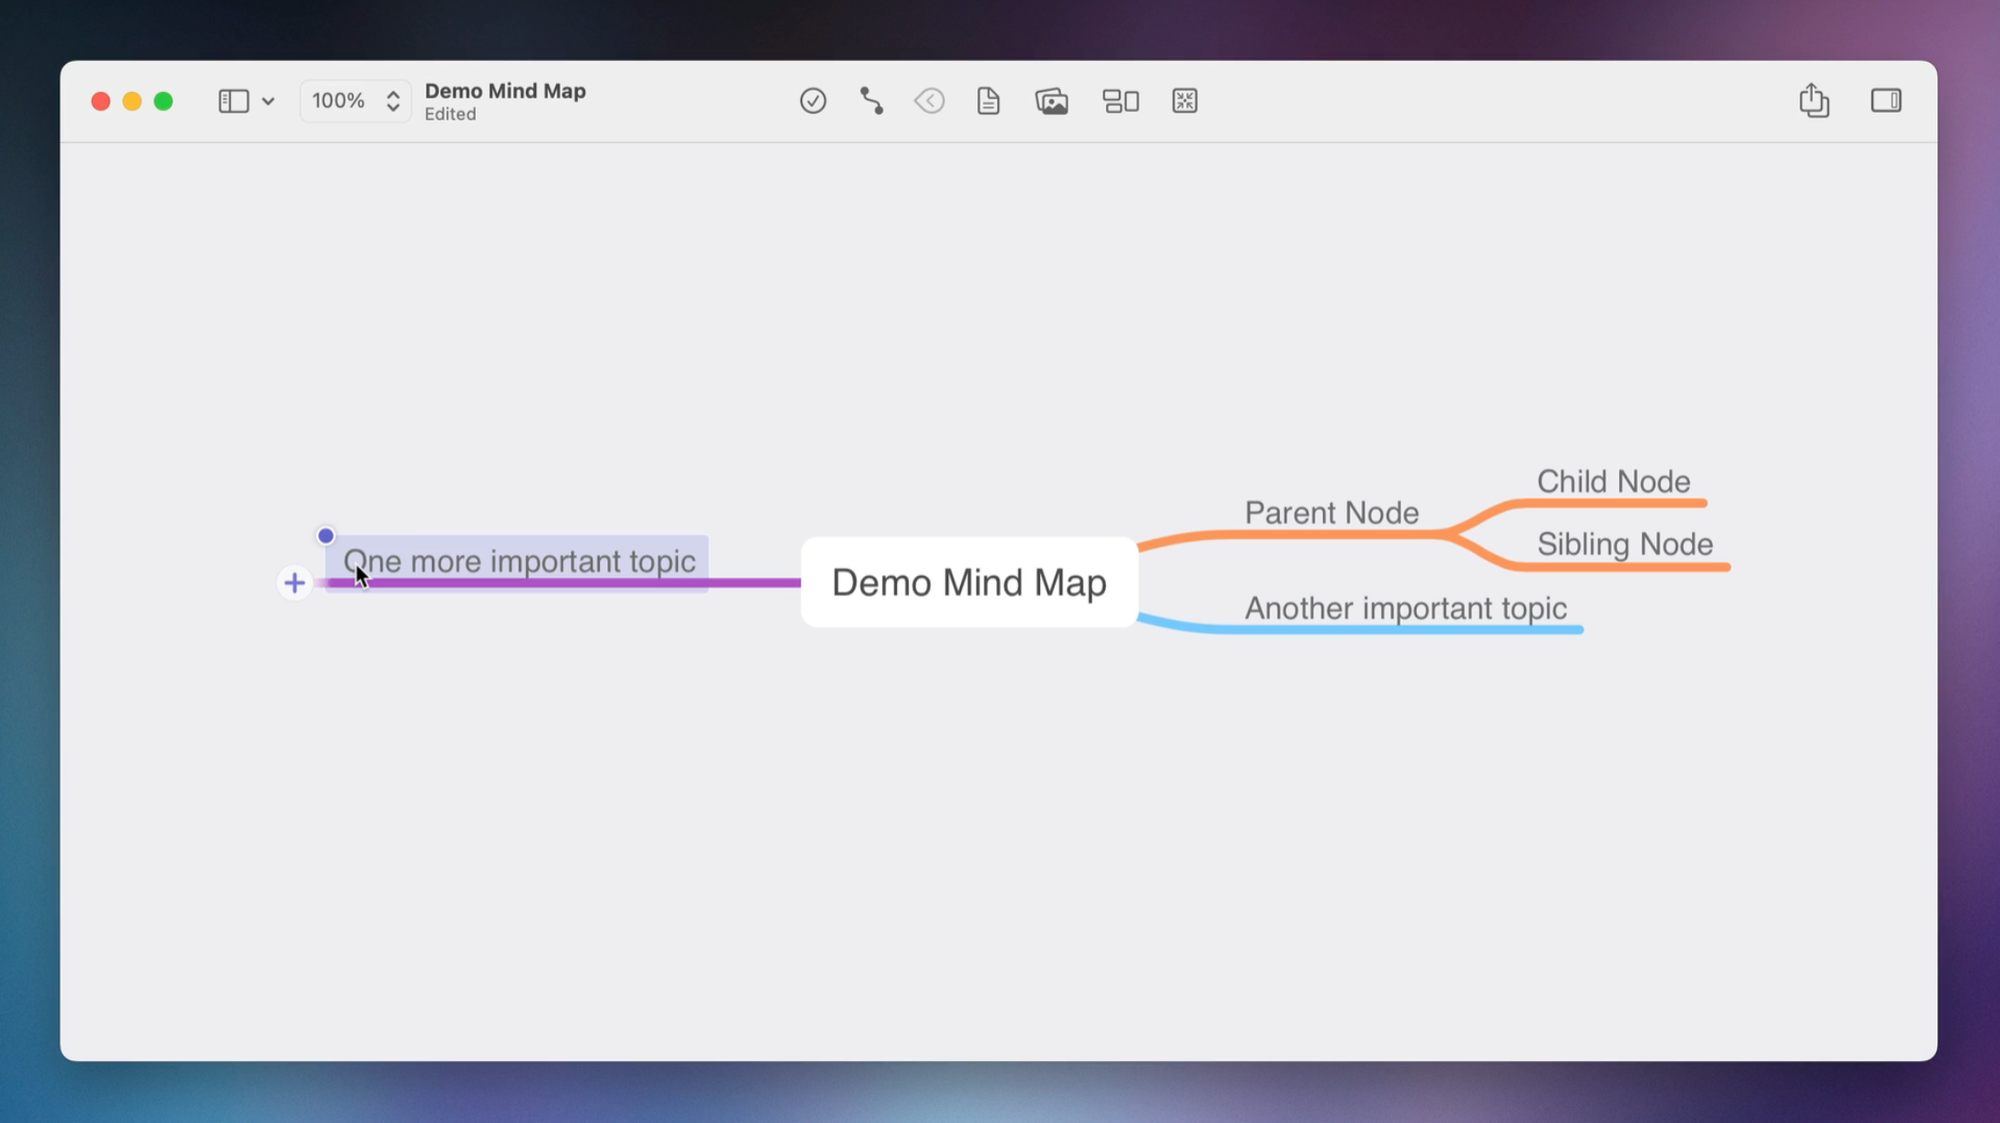
Again, let's create a new branch (this one is purple), and we'll call this "One more important topic." Let's also drag this branch to the other side of the mind map, and then when we release it, MindNode automatically cleans things up so that everything is balanced.
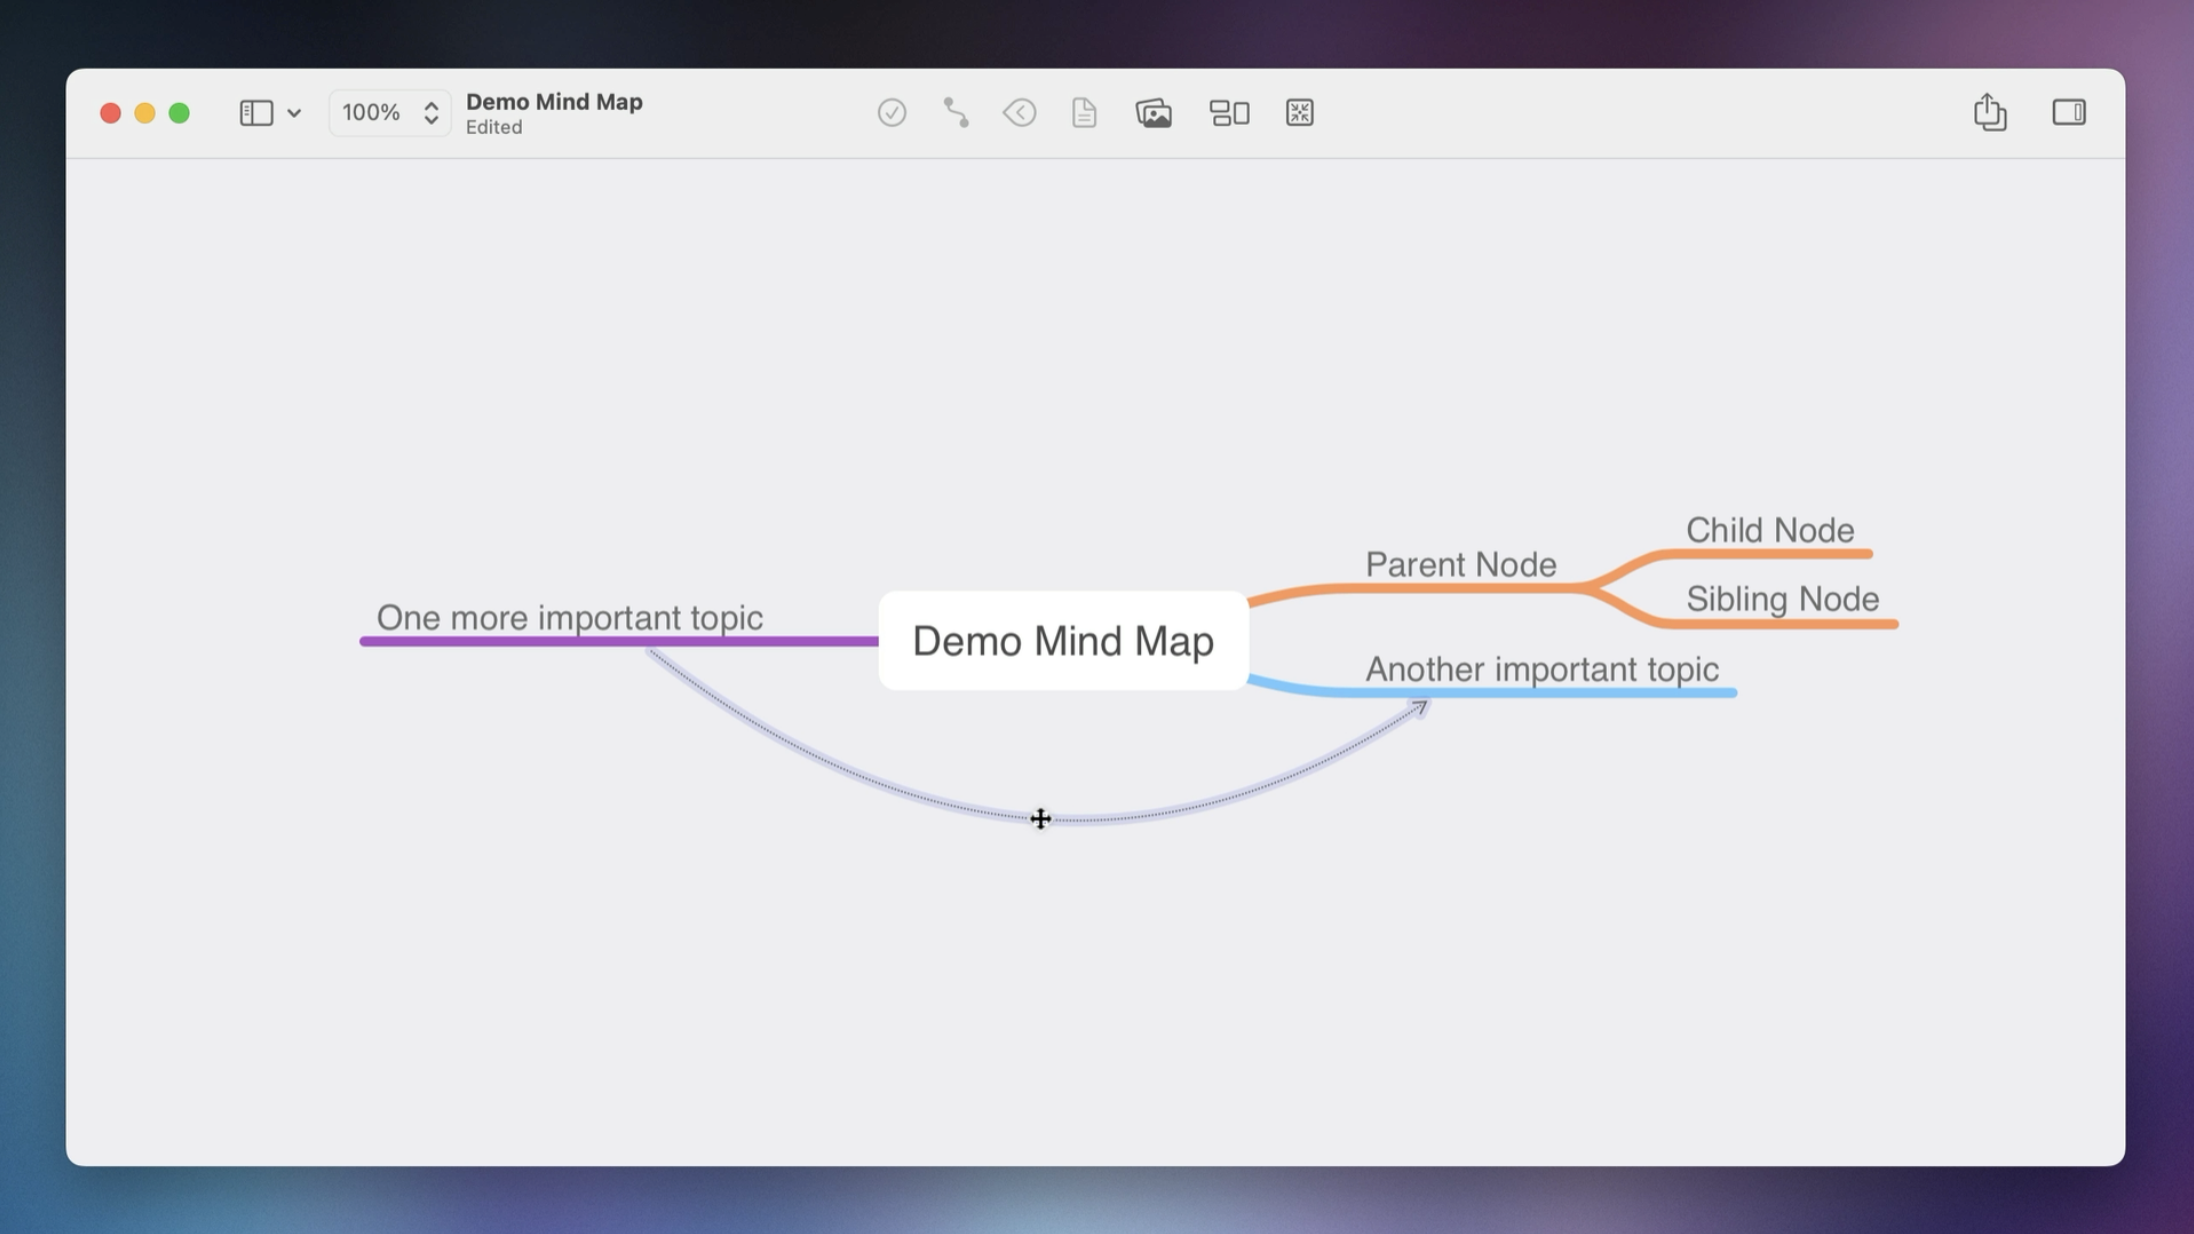
So now we've got branches on both sides of the main node in the middle, but we can make connections from anywhere using arrows. So right-click on this purple branch here, select Connect, and then choose the node we want to connect (i.e., the "Another important topic" node).
That creates the connection, and then we can click the diamond in the middle of the arrow here and drag this to move the curve of the arrow into some blank space on our canvas.
So that's a real basic mind mapping example, but you may be wondering, "What's so magical about this?" Why should you even care about using mind mapping when developing your ideas?
Let's get into that next.
Benefits of Mind Mapping
There are several reasons you should consider adding mind mapping to your PKM toolkit.
- Mind mapping is proven to enable meaningful learning because it uses a concept called chunking to help your brain associate meaningful connections between pieces of information.
- Mind mapping is proven to help with memorization and retention of information, with one study titled The efficacy of the mind map study technique finding that memorization improved between 10-15% when using mind mapping as opposed to rote memorization.
- Mind mapping can also spark creativity in a way that linear thinking can't. Chuck Frey, who has been blogging about mind mapping since 2007, conducted a survey that showed that people reported a 50% increase in creativity when using mind mapping, no matter what their experience with mind mapping was.
- Mind mapping can also boost productivity, with another survey estimating that mind mapping provided roughly 20-30% productivity gains.
The bottom line: if you want to be more productive or creative, you should get used to mind mapping.
Real-World Mind Mapping Examples
Here are several real-life examples of the different kinds of mind maps I've made over the years:
Example 1: Article Research and Planning
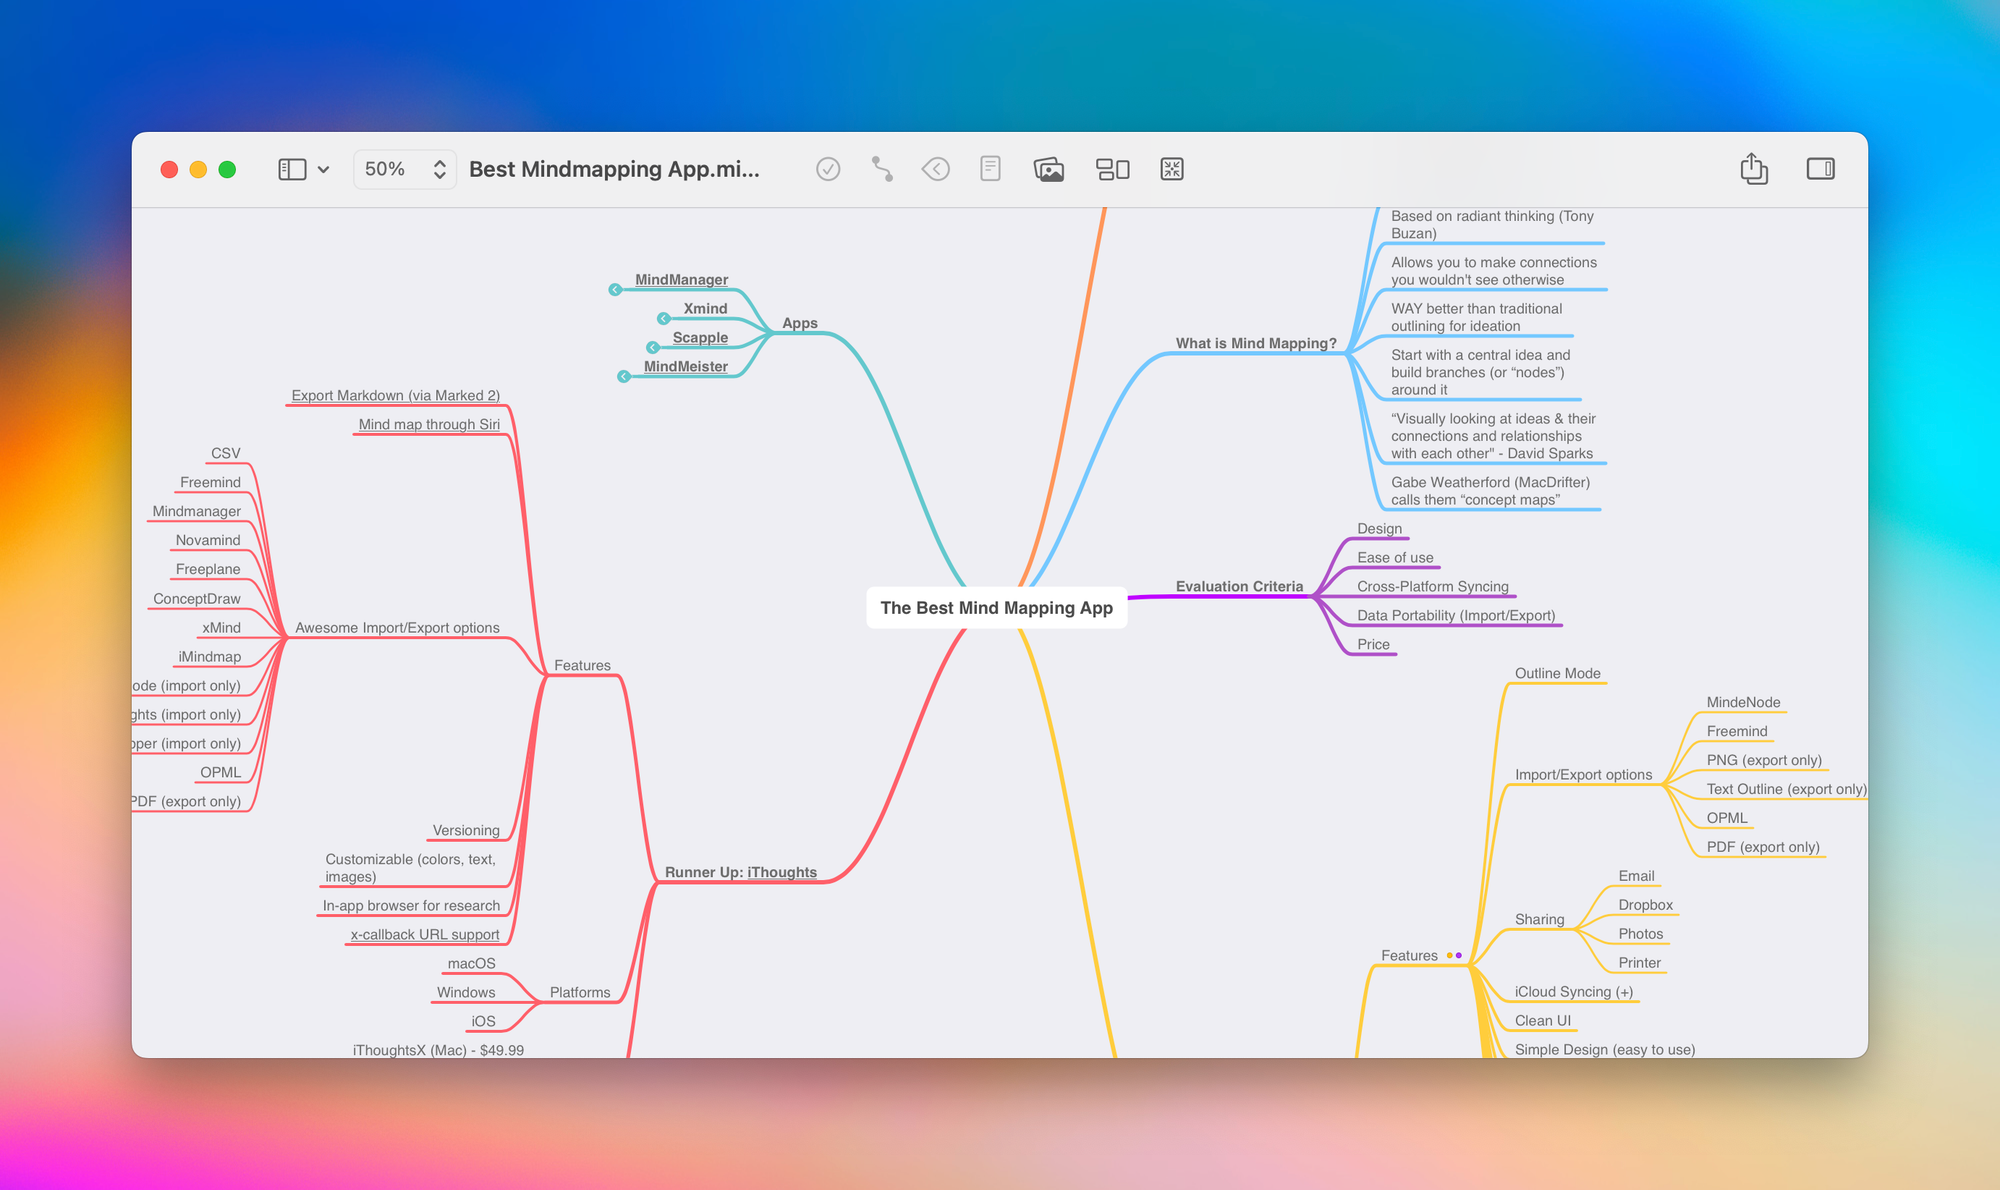
A while back, I wrote an article for The Sweet Setup where I tested multiple mind mapping apps and selected the best one for Mac and iOS. For this article, I created a mind map with the article name in the center and different branches for each section: the applications of mind maps, key details about what mind mapping is, and evaluation criteria for selecting the best app.
One major branch was dedicated to my pick (MindNode), describing its key features, what I liked about it, available platforms, and pricing. Another branch covered the runner-up (iThoughts), with similar details. Additional branches contained information about other apps I tested, with nodes folded to reduce clutter while preserving the research details underneath.
This mind map served as my research hub. When I sat down to write, I could simply reference the mind map and crank out the words, adding details as needed. The act of writing became much easier because all my thinking had already been organized in this mind map.
Example 2: Video Content Planning
Earlier this year, I published an Obsidian Report Card video on my YouTube channel. While planning this video, I created a mind map with branches for each section I wanted to cover: desktop, mobile, core plugins, community plugins, etc.. Under each section, I added nodes denoted with emojis:
- ➕ for things I liked
- ➖ for things I didn't like
- 💡 for interesting points
- ❓for questions I had
- 🔥 for my "hot takes" (like my opinion that the big graph view is essentially useless)
Here's what the mind map looked like when I was done:
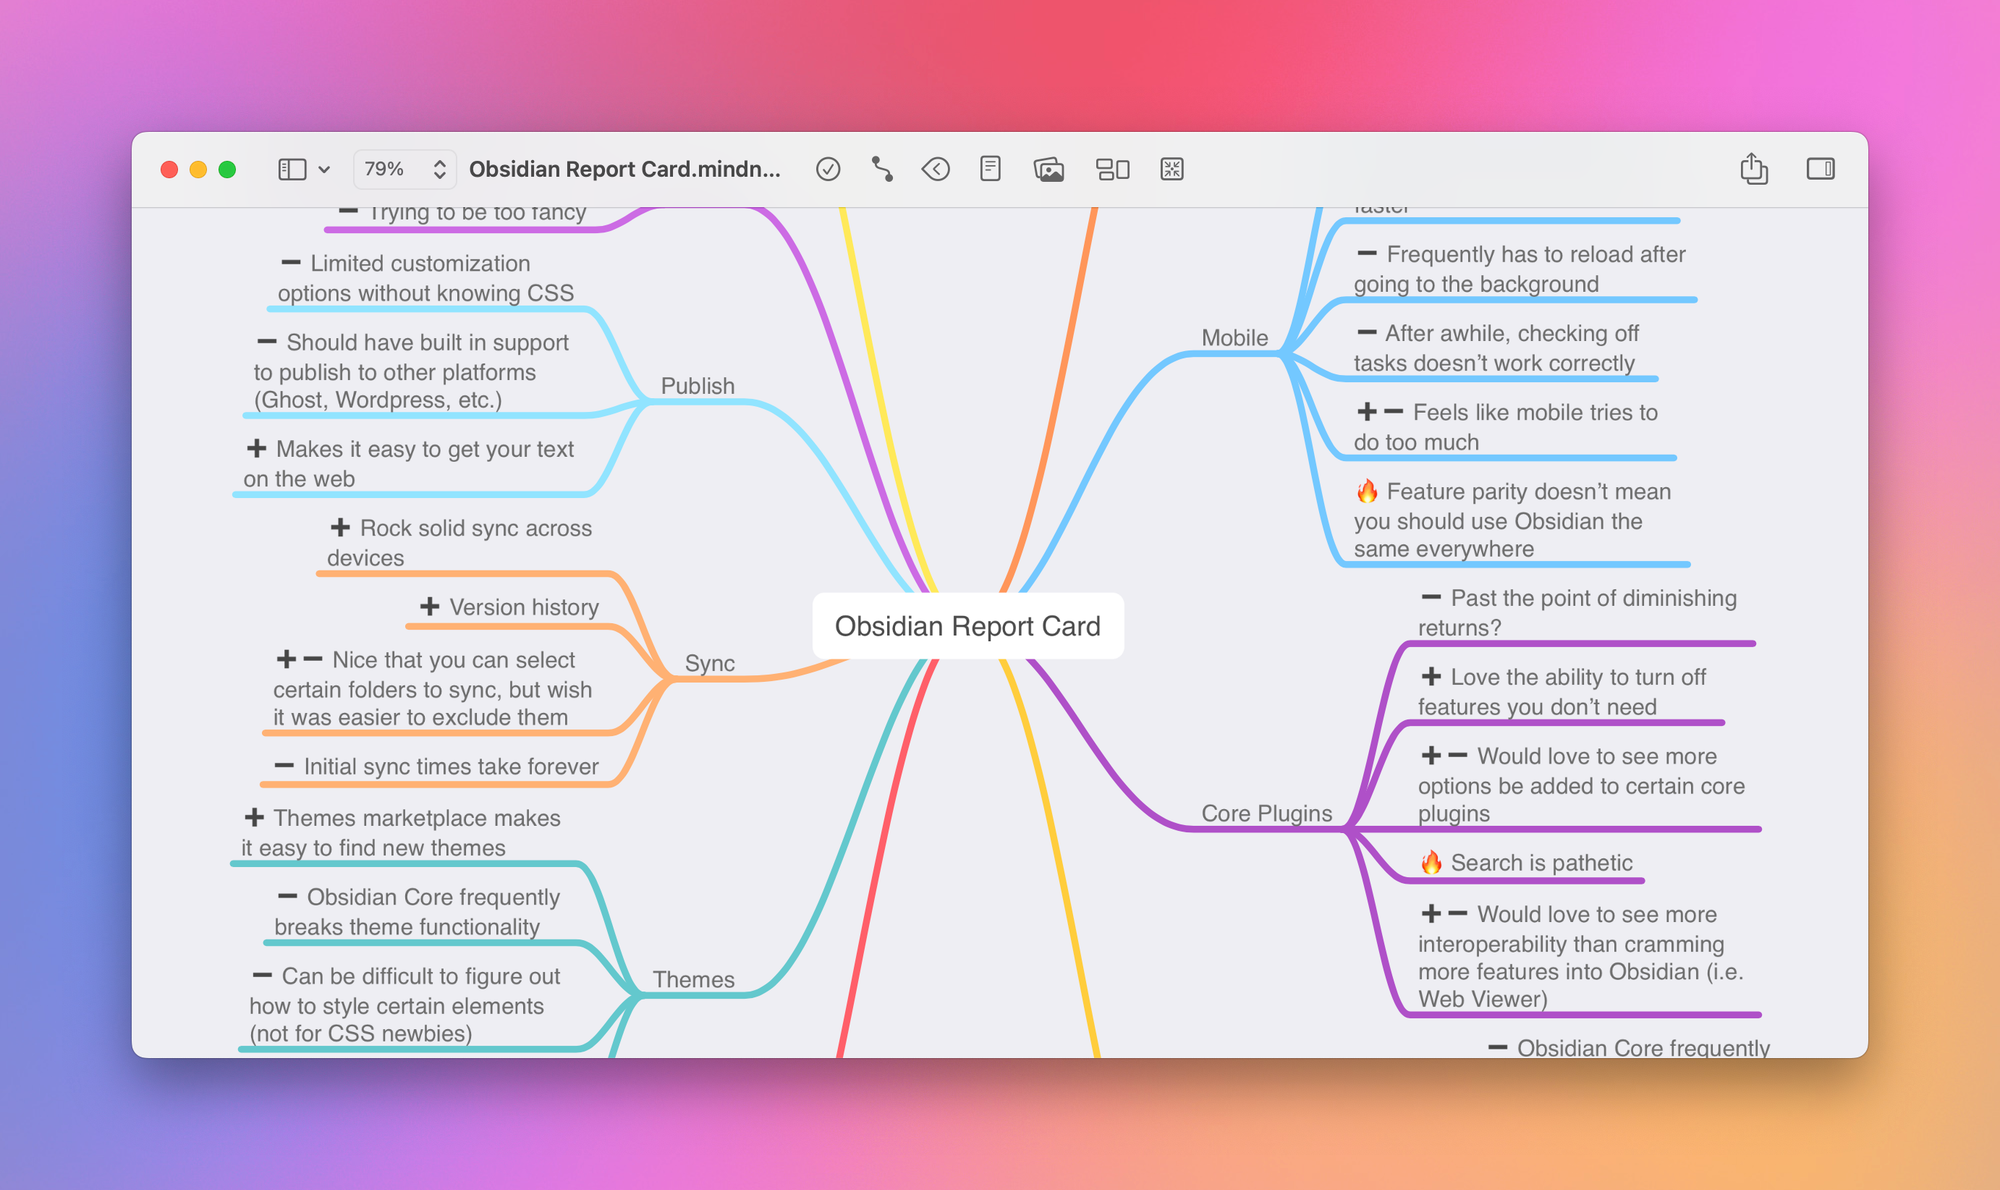
With all my notes organized in this mind map, scripting the video was easy. I simply went from section to section and wrote everything out in Obsidian before sitting down to record the video.
Example 3: Workshop Development
Last summer, I presented a three-hour Reading Masterclass workshop. But before I made the presentation, I created a mind map to nail down the flow. Each major section had its own branch with child nodes for the key points I wanted to cover:
- Finding and filtering books to read
- Building a consistent reading habit
- Getting more out of what you read (covering the four levels of reading)
- Different reading workflows for analog & digital books
- Using information from books to be more productive and creative
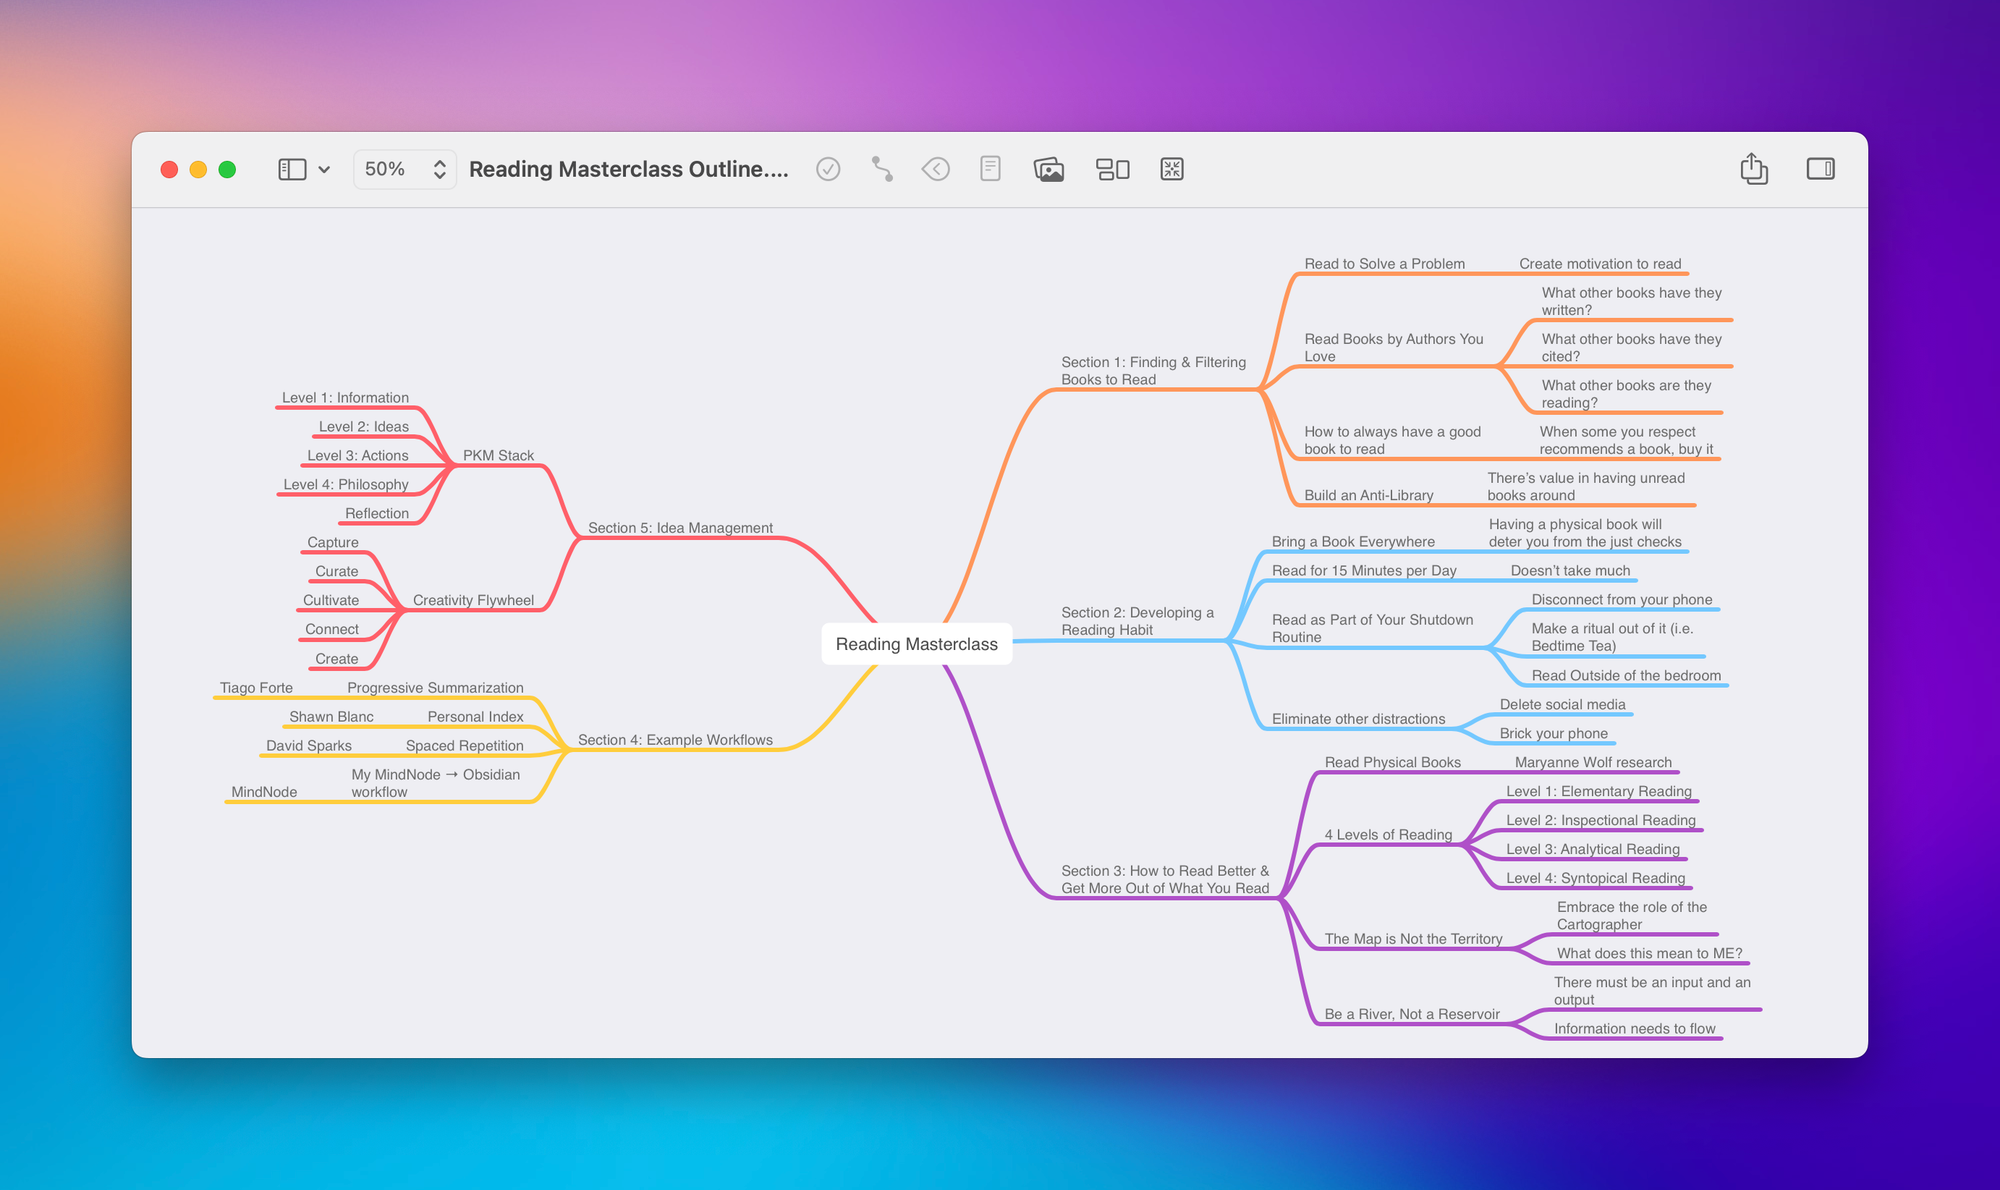
Now, this mind map may not look all that detailed, but this really helped me nail down the flow for the workshop.
Once the mind map was complete, I created slides in Keynote for the presentation. The mind map helped me figure out the flow before I started working on the actual content.
Example 4: Book Notes
I also use mind maps for taking notes on books that I read. I place the book cover in the center of the mind map and create branches for each section. Within each section, I add child nodes for chapters and capture ideas that resonate with me, along with key visuals.
Over the years, I've developed my own emoji coding system for these mind maps:
- 🔑 = key arguments
- 💡 = big ideas
- 🗣 = discussion points for Bookworm
- 💬 = quotes
- 🤯 = crazy statistics or statements that blow my mind
Here's what it looks like when I'm finished:
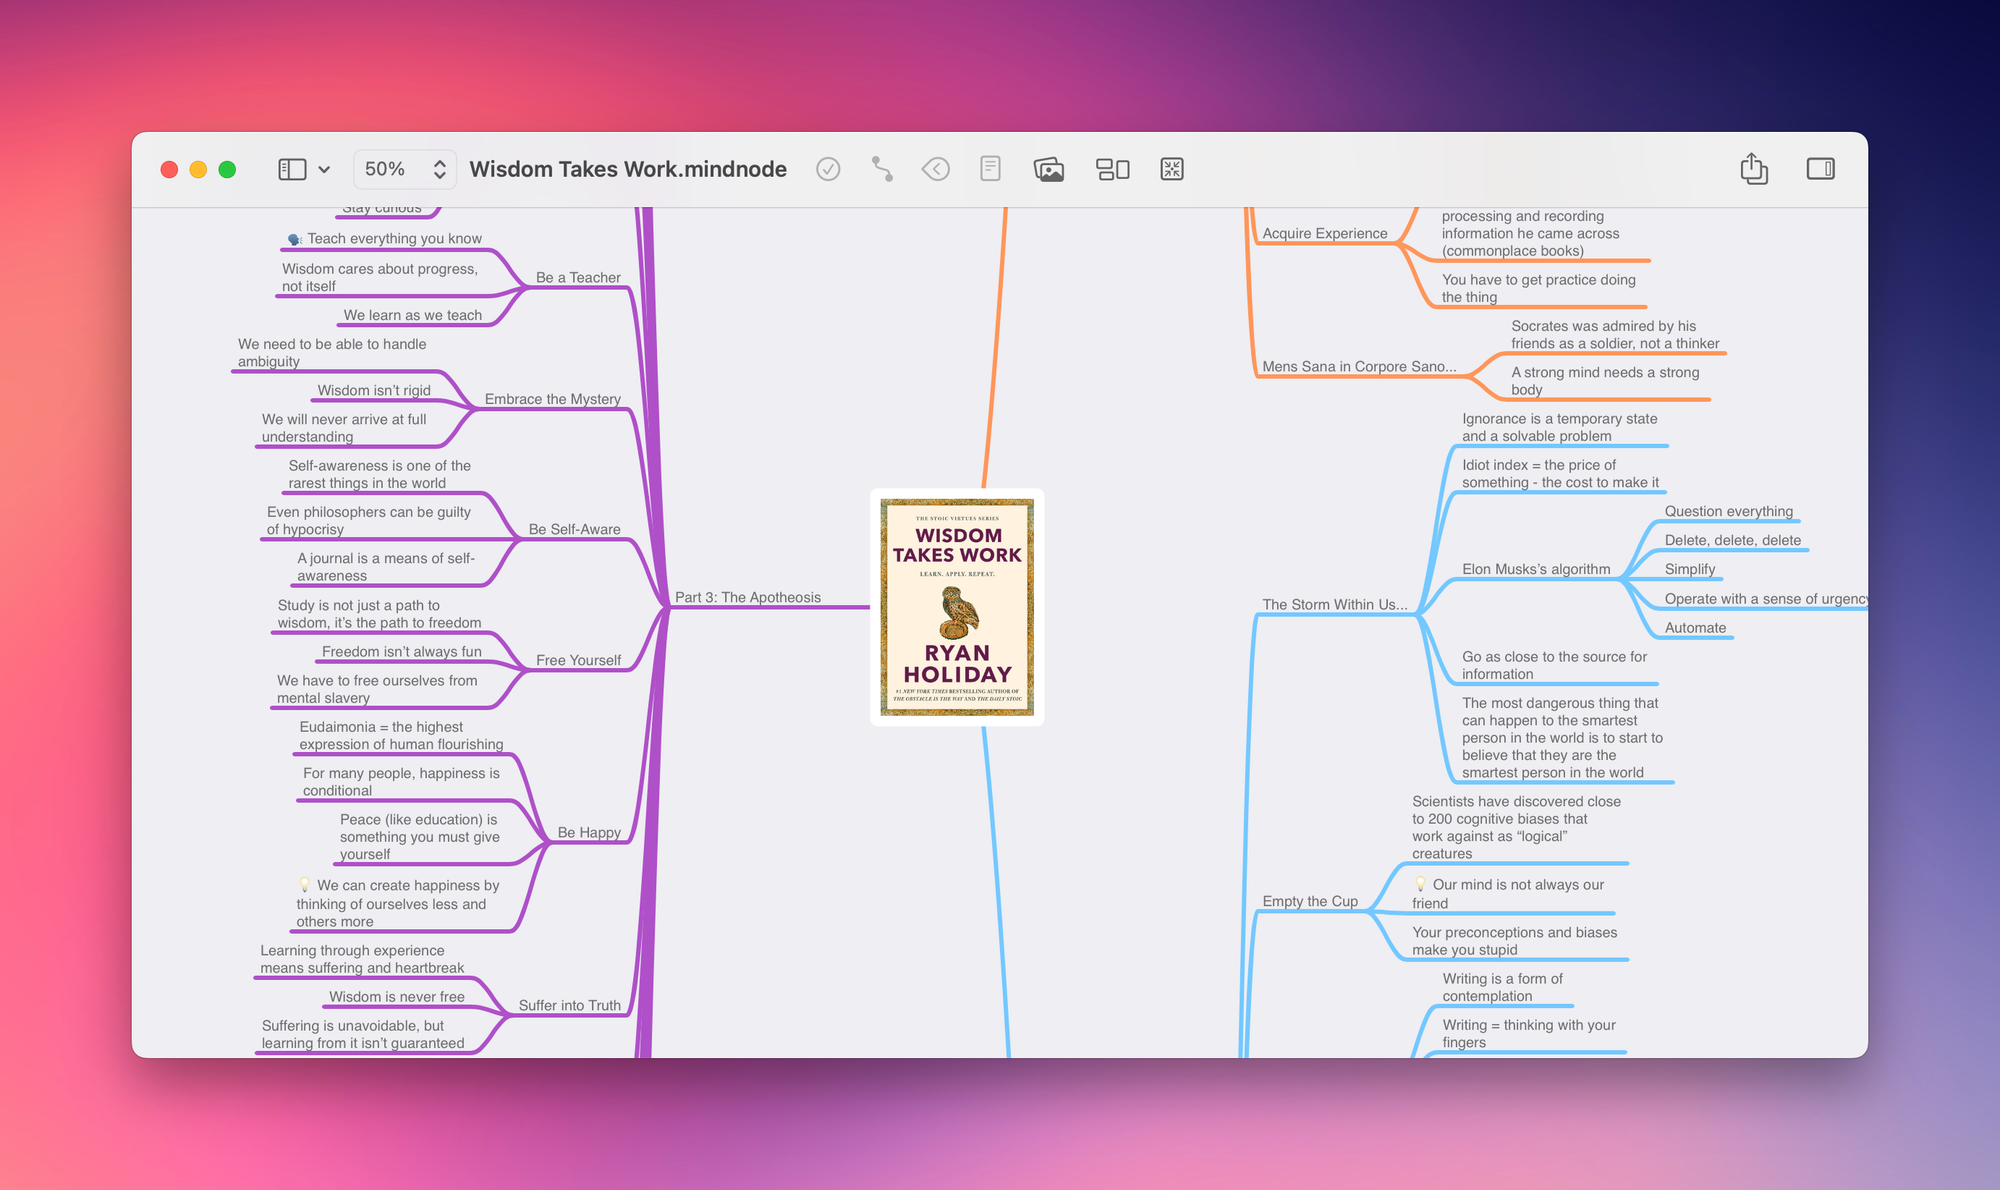
When I finish reading a book, I export both the mind map and an outline version to Obsidian. I've built a collection of over 200 book notes using this method, and you can download it for yourself in an Obsidian vault available here.
Getting Started with Mind Mapping
If you're ready to start mind mapping for yourself, here's my recommended approach:
Step 1: Choose Your Mind Mapping App
Select a tool that works for your specific workflow needs. MindNode is excellent for Mac and iOS users, MindMeister is great if you need to collaborate, and Xmind offers a solid cross-platform solution. Pick the app that fits your workflow and stick with it long enough to become comfortable using it.
Step 2: Practice with Real Problems
The next time you feel yourself struggling to make sense of an idea, put it in the center of a new mind map and start creating branches and nodes that connect to that central concept. Add everything that comes to mind. Don't overthink it! Just start adding related ideas as they come to you.
Step 3: Switch to Linear Tools When Ready
After working in your mind map for a while, you'll likely gain much more clarity on the path forward. That's the perfect time to switch over to something like Obsidian for the actual writing. The mind map serves as your thinking and planning space, while linear tools handle the creation phase.
Remember, the key is to bounce back and forth between these two modes. The practice of developing your ideas through mind mapping is crucial if you want to get the most out of your notes and ideas before you sit down to write about them.
The Bottom Line: Add Mind Mapping to Your Creative Toolkit
Mind mapping is a powerful sensemaking tool that bridges the gap between capturing information and creating meaningful output. It's not about replacing your existing tools but about adding another dimension to your creative workflows. Mind mapping is simply another tool in your creativity toolkit. By incorporating mind mapping into your workflow, you give yourself permission to think differently, explore ideas more freely, and ultimately, you will transform scattered notes into coherent, valuable insights.
Whether you're planning content, researching topics, organizing information from books, or simply trying to make sense of a complex idea, mind mapping can help you think more clearly and create more effectively. Give it a try, and you might just discover that the creative potential you've been seeking was already there in your notes—it just needed the right key to unlock it.


