


Historically, I've used the Projects plugin to manage my different writing projects.
Unfortunately, shortly after writing about my workflow, the developer announced he was retiring the plugin several weeks ago, and I've been trying to find a new workflow ever since.
This week, I finally solved it by using a combination of the Kanban, Templater, and QuickAdd plugins. In this post, I'll walk you through how I set everything up.
My Writing Workflow Requirements
Specifically, there were 3 things I wanted my writing workflow to have:
- I wanted to be able to visualize my writing projects in a Kanban style view so I could see progress as I worked on my writing projects, visualized by the cards moving from left to right as I worked on them.
- I wanted note templates for the different types of writing projects I did to automatically be applied to the notes themselves with the appropriate metadata and sections when necessary, so it minimized the friction when it was time to just sit down and write.
- I wanted the status of the notes to automatically update as the cards move from column to column, which is necessary for me because I have an automation that automatically archives these notes once the status property is set to published.
While I couldn't just replace the Projects plugin with something else that did all of this, I was able to craft a workflow that used existing plugins that I already had installed in my Obsidian vault, plus one new one for a very specific purpose.
Let's break this down piece by piece.
Part 1: The Kanban Board
The first part is the easy part: a kanban board to manage my writing projects. I knew this part would be easy to build using the excellent Kanban plugin by mgmeyers. This plugin lets you turn any note into a Kanban board, and you can create columns or swim lanes for each of your project statuses.
Here are the project statuses I use:
idea(when something is still being developed)backlog(when I've selected something to be worked on, but I haven't started it yet)inprogress(when I'm actively working on a project)review(when I need to look something over or make a decision about something)published(when the post, newsletter, or YouTube video has actually been published and is publicly available)
You can create these lists by clicking the three dots in a column and selecting either Insert list before or Insert list after, where the former will place the new list to the left of the current list and the latter will place it to the right.
Once you have your lists, you can easily add cards by clicking the Add a card button in one of the lists. You can add text to your cards and also link them to notes in your vault by using [[. Once you have the note that you want linked selected, hit Enter to add the card. Now you can drag the cards into the appropriate column, and command-click the link to open the note in a new tab when it's time to write.
While you do have to add each card by hand, I actually don’t mind being a little bit more intentional about the projects I actually want to track.
That's the main thing I needed from this plugin, but before we move on, there's also a setting to Merge the linked page metadata in the Kanban plugin settings. This lets you display metadata below the cards in your Kanban view, which looks something like this:

Personally, I like the way this looks much better than the visualization of the Projects plugin. So while I have to manually create the cards for now (I'll show you a shortcut for that in a little bit), the board does display some additional information from the linked note that I find useful.
Part 2: The Templates
The next thing to tackle is the templates, as one of the things I really liked about the Projects plugin was the ability to apply a specific template whenever a new note/card was created. Fortunately, using the Templater plugin, we can achieve the exact same thing.
The key is a section in the settings for Templater called Folder Templates. This allows you to choose a specific template file to apply whenever a new note gets created in a folder that you choose. I actually use this already for a bunch of different folders in my vault, so it was pretty easy to set up folder templates for all my newsletters, articles, and video scripts using template files that were already in my vault:
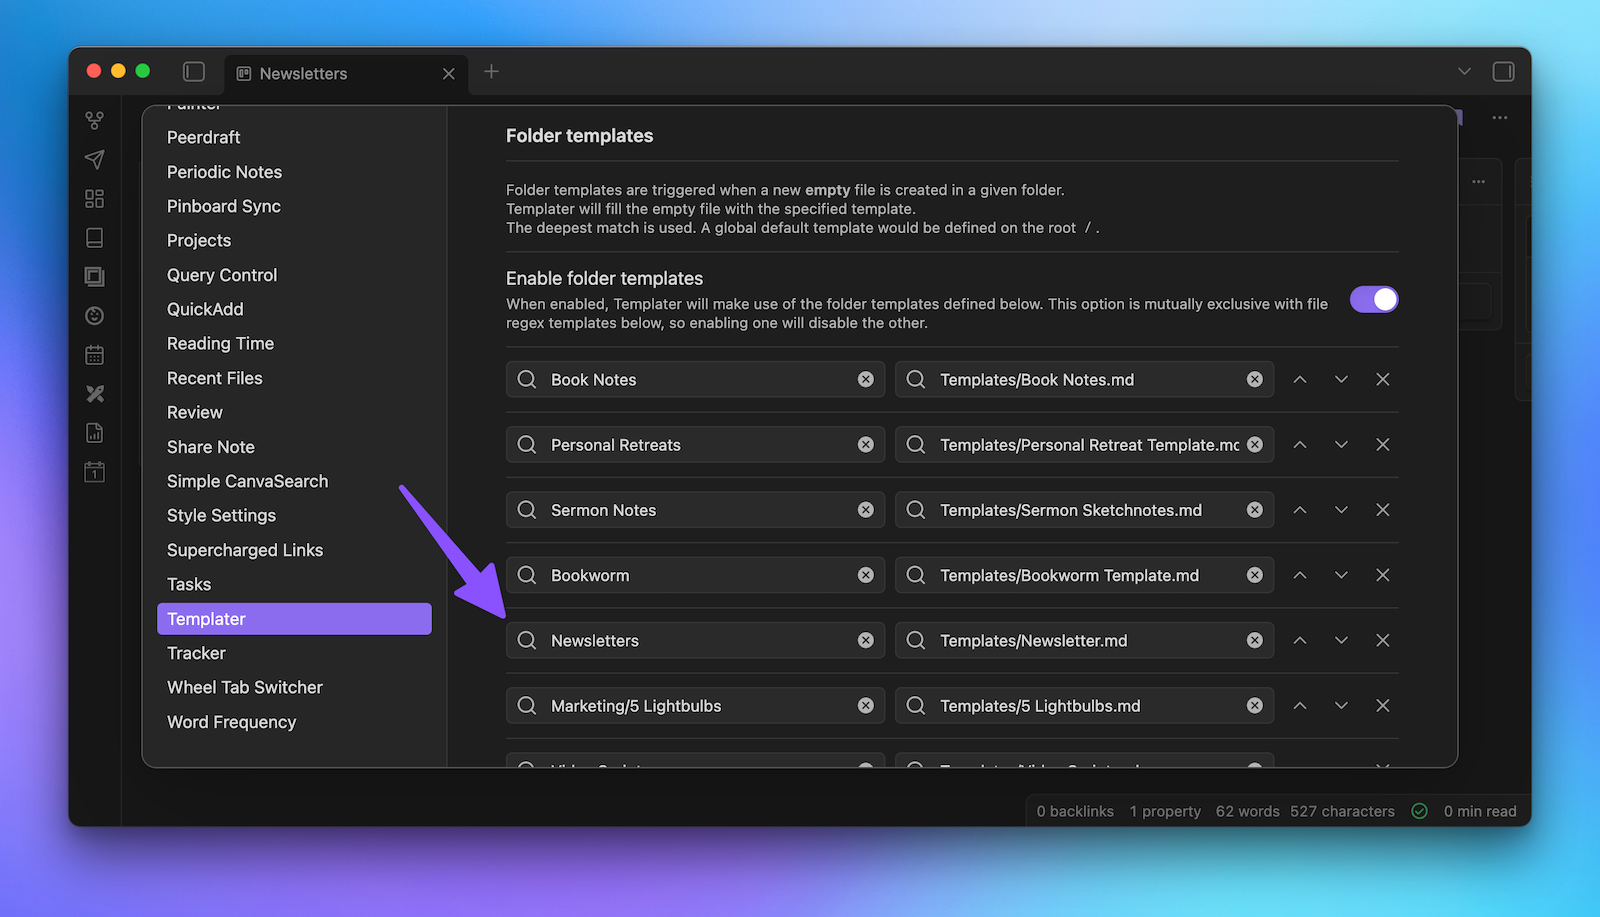
There are pros and cons with this approach, however. The good news is that this will now fire whenever you add a new note to the designated folder in your vault (not just via the plugin). The bad news is that it does still require you to manually create the note in the folder before creating the card on the Kanban board.
And honestly, if that was the way things had to be, I'd probably be ok with that. It feels a little bit to me like intentional friction. I don’t really mind right-clicking on the folder and selecting Create new note before linking the note in the card.
But we can actually create the note and the card at the same time using a QuickAdd macro.
Part 2.5: The QuickAdd Macros
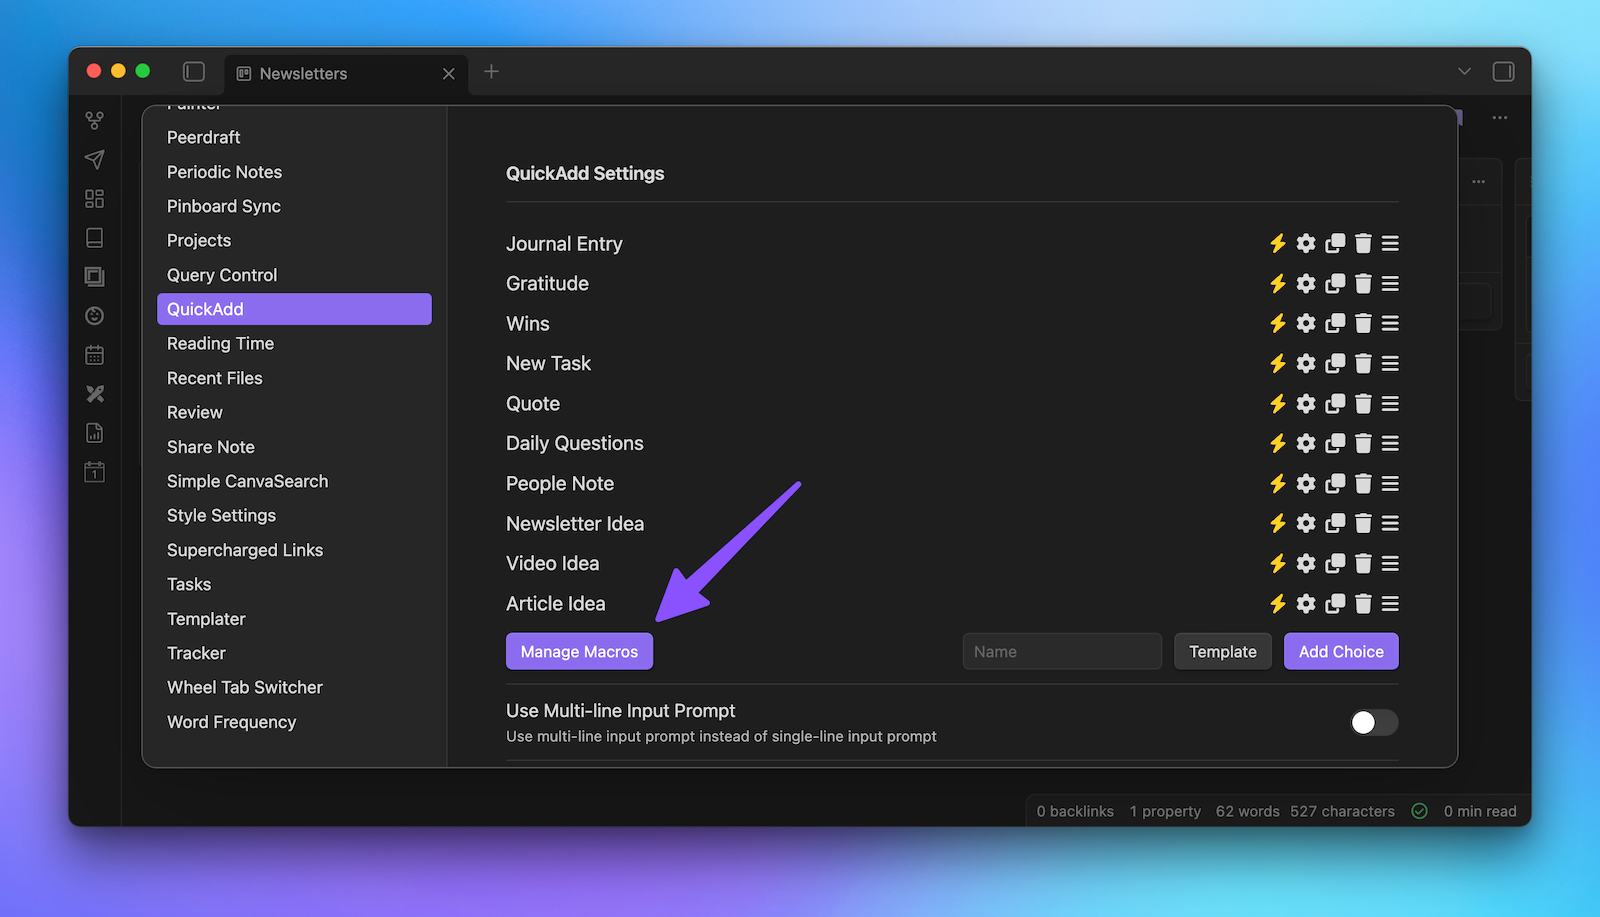
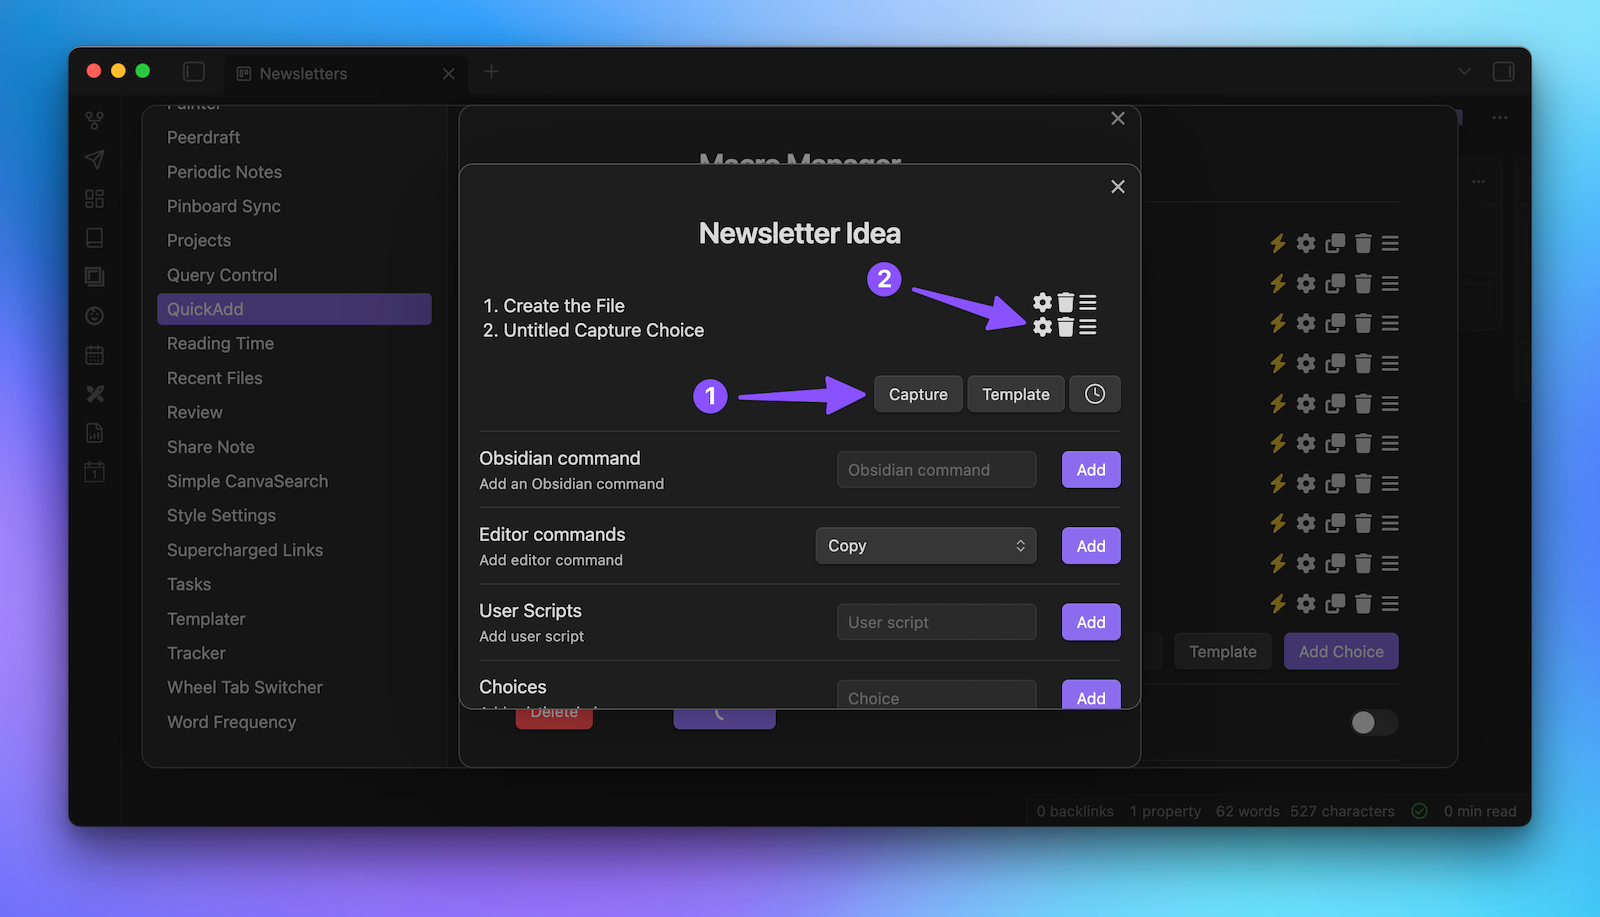
This part gets a little bit tricky because we have to build a couple of different parts for this to work. First, go to the QuickAdd settings, click Manage macros, give your macro a name like Newsletter Idea, and then click Add macro.
Next, click the Configure button, and then click the Template option. This will create a new "Untitled Template Choice" option at the top, so click the gear icon to edit this.
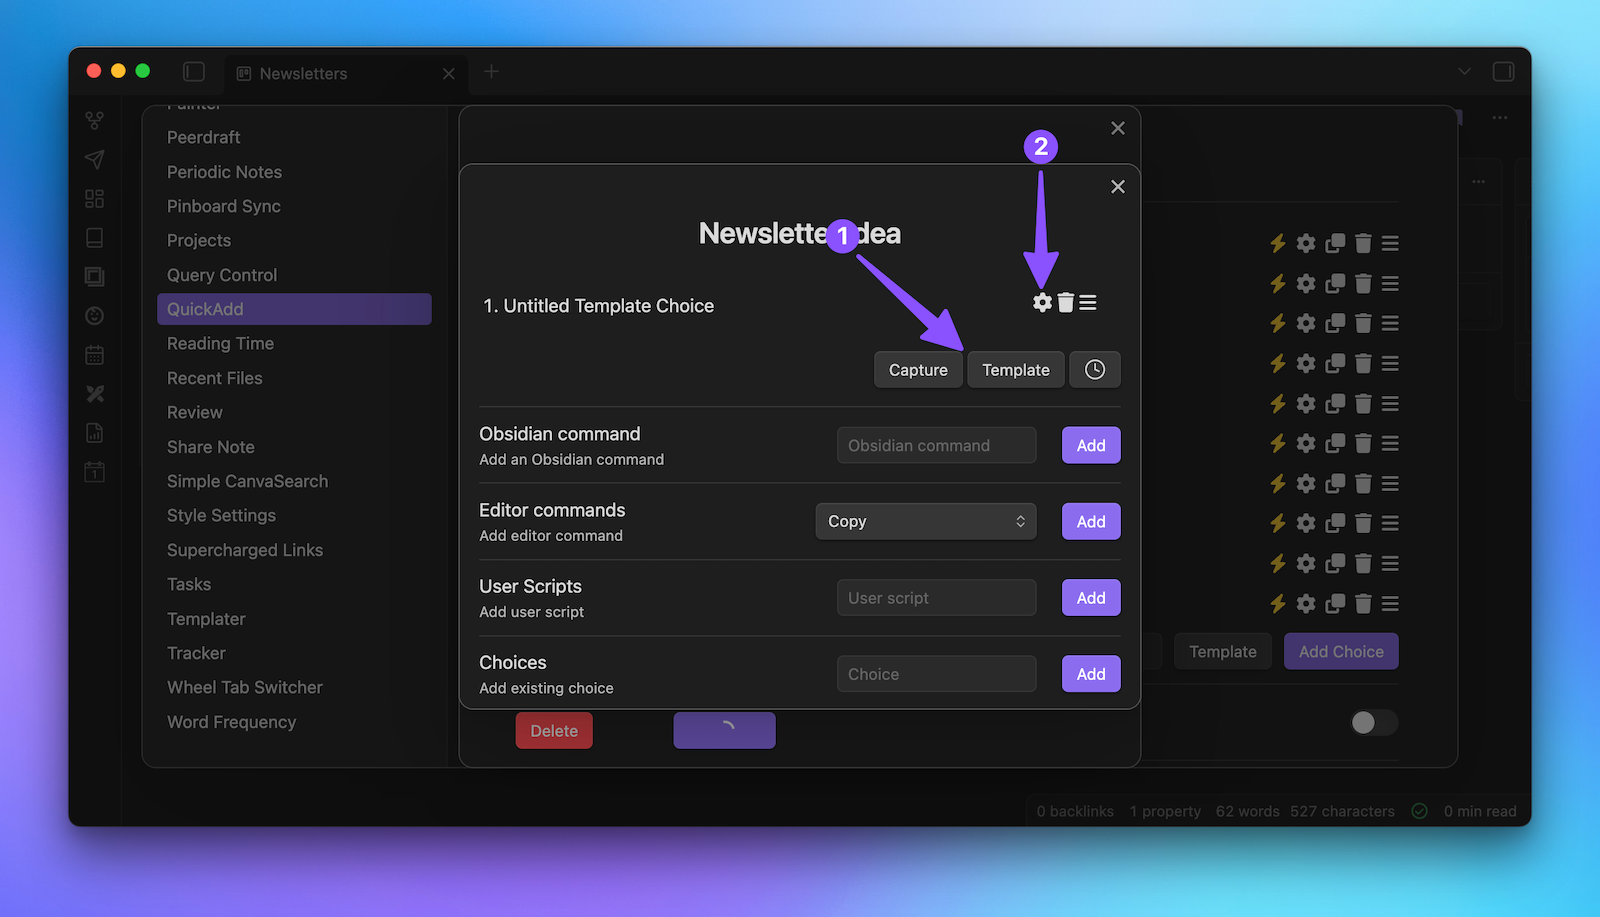
Note that this part actually doesn't require the Templater piece we just set up. We'll basically be recreating this with QuickAdd, but it's only going to fire when we run this specific macro from the Command Palette.
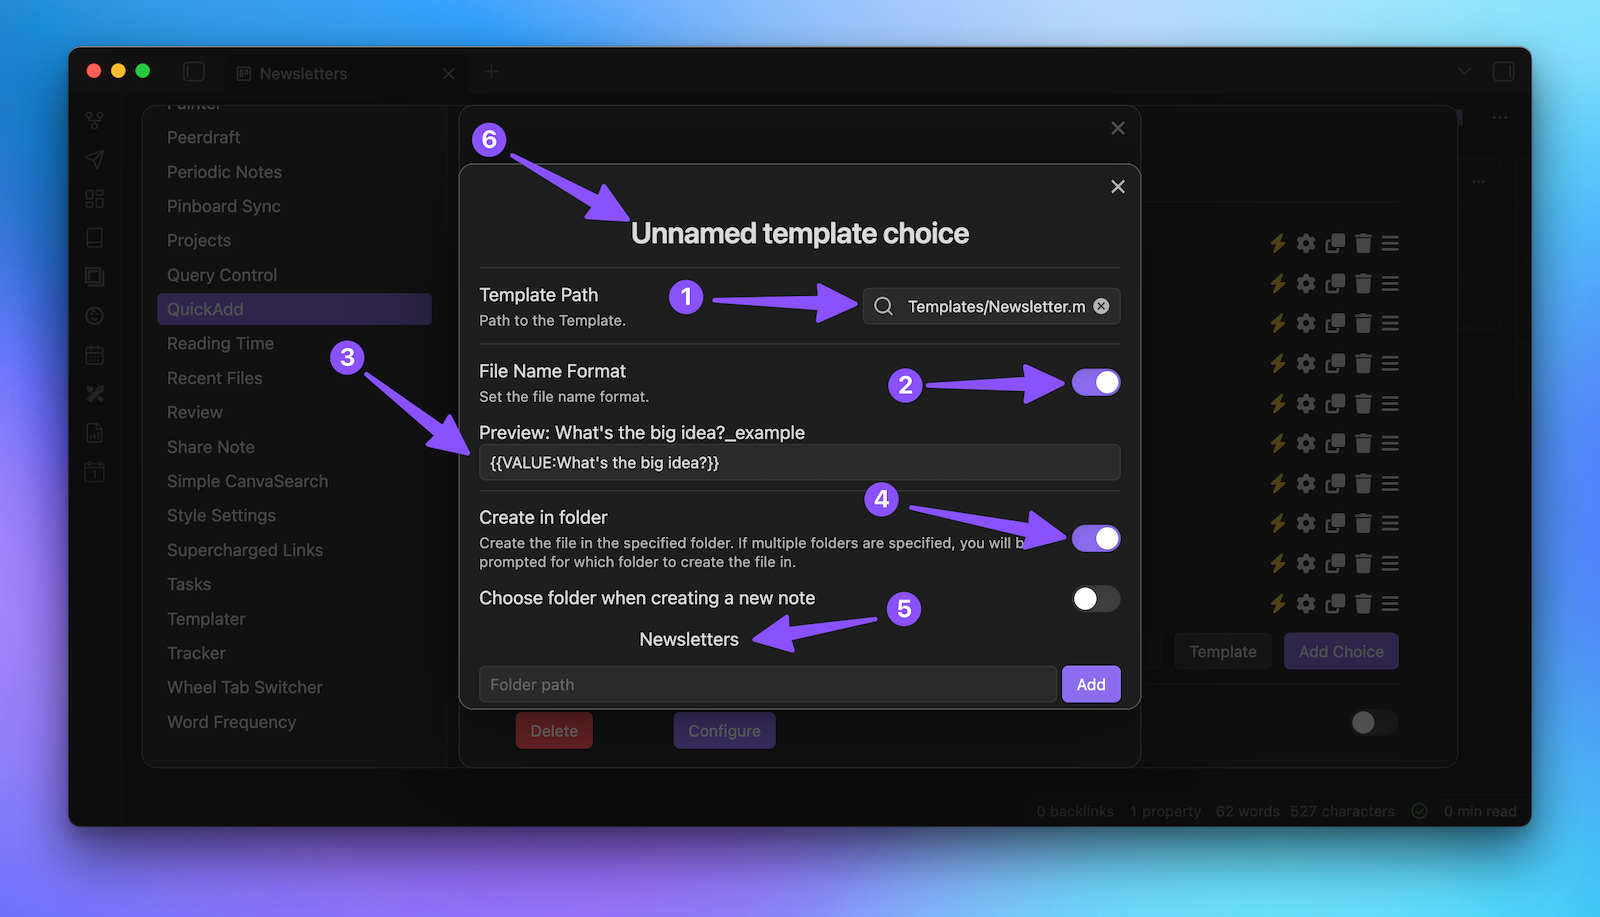
Ok, so to set this up, first we need to select the template from the Template Path. So, for my newsletter, I use the Newsletter.md file from my Templates directory. Next, you have to toggle on the File Name Format option and enter {{VALUE:What's the big idea?}}. This will create a popup when we run the macro that gives us a prompt where we can type out our idea, and it will be used for the file name.
You also need to toggle on Create in folder since we want this file to be added to a specific folder, and make sure to click the Add button so the folder location actually gets saved. You can also click on the name if you want to rename this, for example, Create the File.
Once you're done, you can close this and add the second part of this macro, which is the Capture part. Click on the Capture button to create an "Unnamed Capture Choice", then click on the gear icon to configure it.
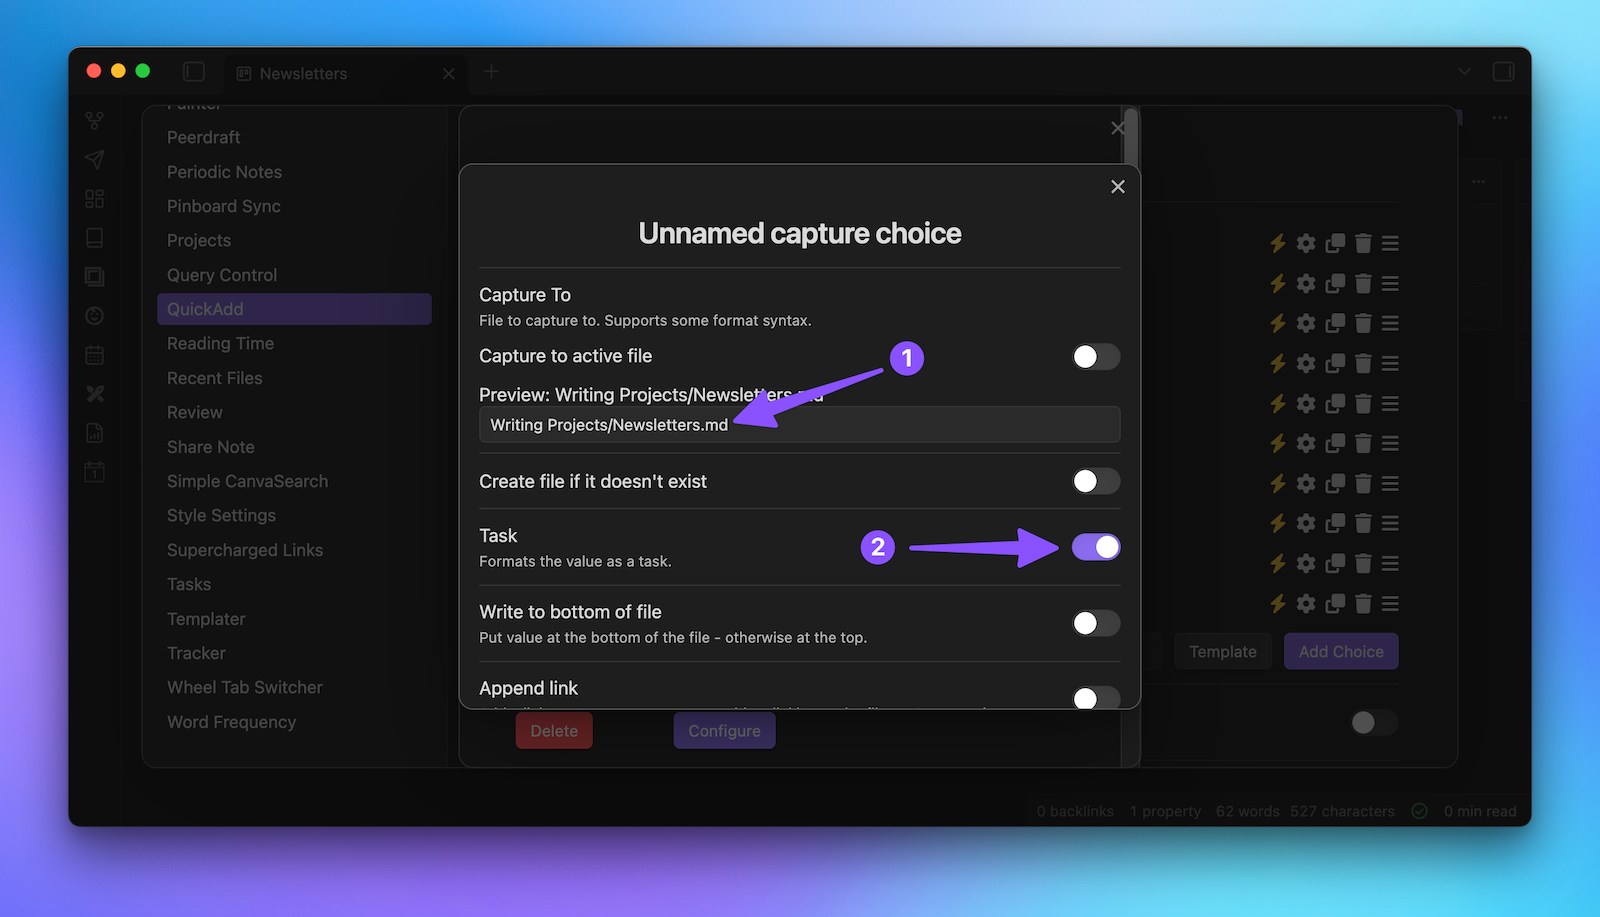
Ok, so first, we need to make sure that we capture the text to the right file. We do not want to capture to the active file, and instead want to capture to the file that we are using as our Kanban board. So in this example, it's the Newsletters file inside my Writing Projects folder.
We also want to make sure that we capture the text as a task since that's the Markdown format used to display the cards in the Kanban plugin.
Next, we also want to toggle on the Insert After option, which allows you to append the text we capture to a specific spot in the file. In this case, we want to capture after the second-level header, ## idea.
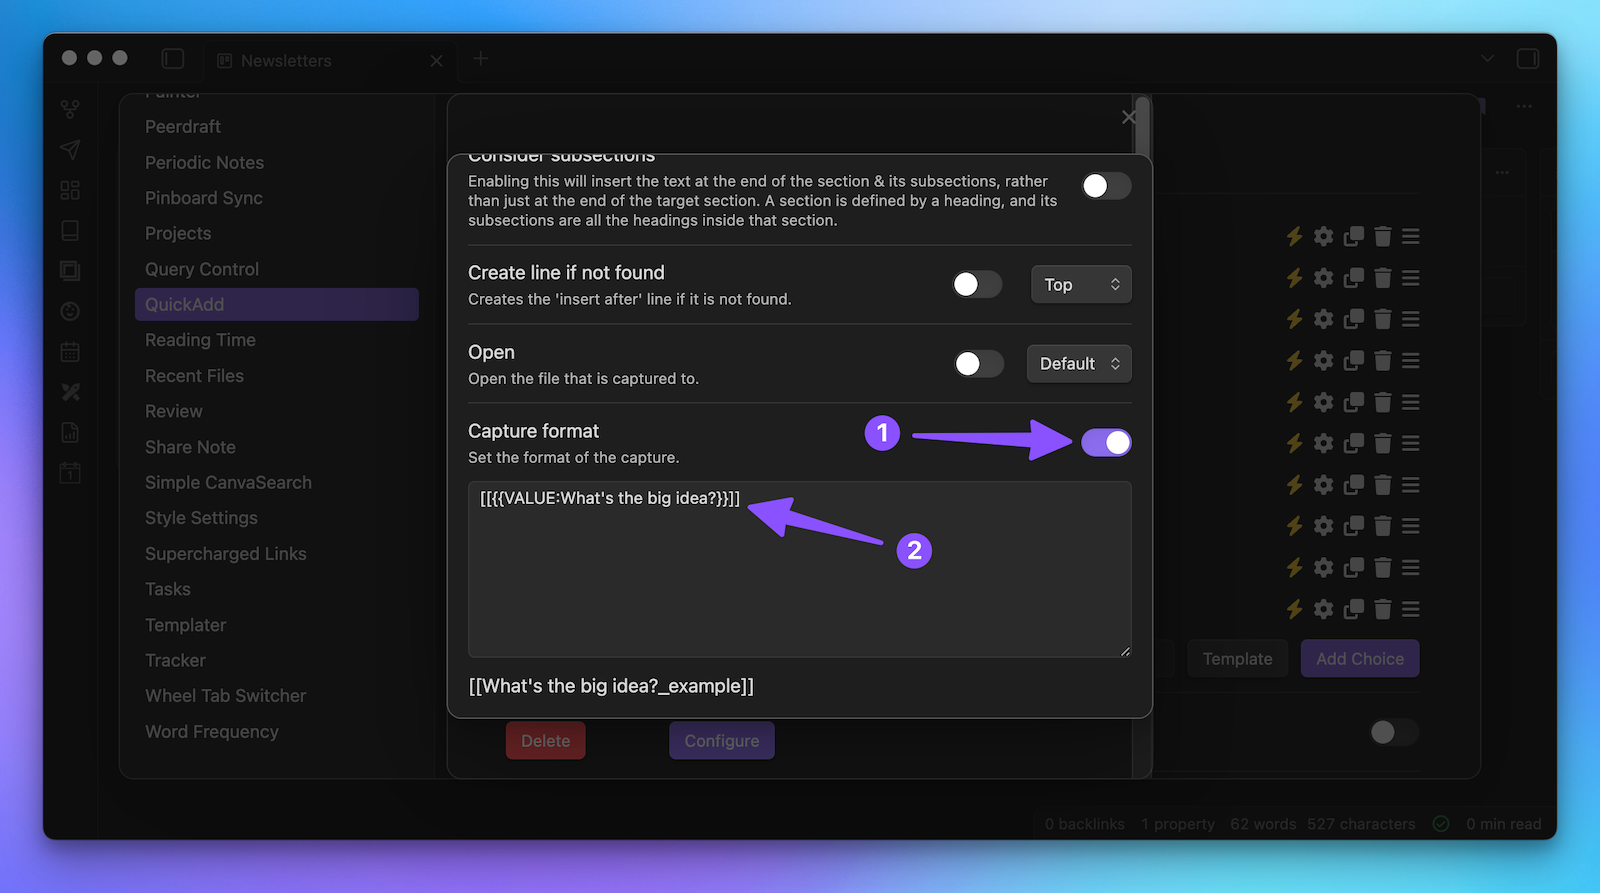
Finally, at the bottom, toggle on the capture format and use the exact same code we used for the title name previously, {{VALUE:What's the big idea?}}. The only difference this time is that we want to wrap all of that inside double brackets, which will create an internal link to the file for the card that will open the file created in the first part of the macro.
Again, click on the name to rename this step to something like Create the Task, then close the macro manager.
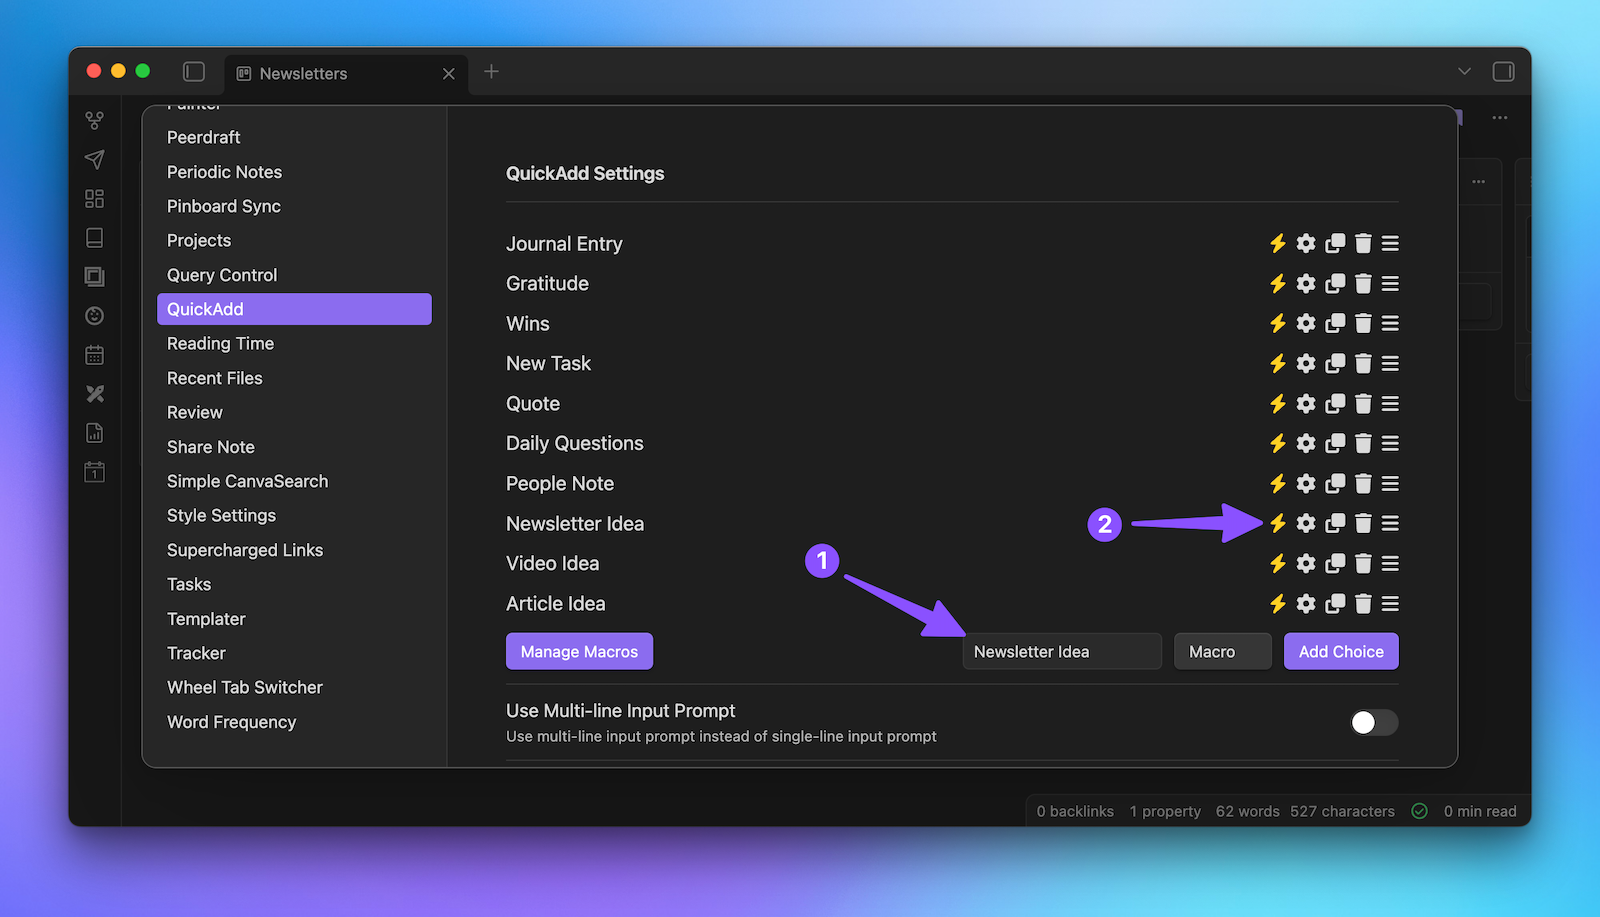
The next step is to create the QuickAdd command for the macro we want to run. So type the name in the text box (i.e. Newsletter Idea), select the Macro option from the drop-down list, and click the Add choice button. Select the macro you want to run, click the X to close the popup, and click the lightning bolt icon to make this command searchable by the Command Palette.
So now, from anywhere in our Obsidian vault, we can invoke the Command Palette, run the command, type the text we want to capture in the popup for "What's the Big Idea?" and not only does the file get created in the appropriate folder but the card gets created in our Kanban board as well.
Alright, so it's really coming together now, but there’s still a very important piece missing: updating the status as you manage your writing projects.
Part 3: Automatic Status Updates
For that, we need the Kanban Status Updater plugin, which is very simple and does just one thing: updates a particular metadata property whenever you move a card.
So go into the settings of the Kanban Status Updater plugin and set your Status property name to the property you want to automatically update. In this example, I just use the status property.
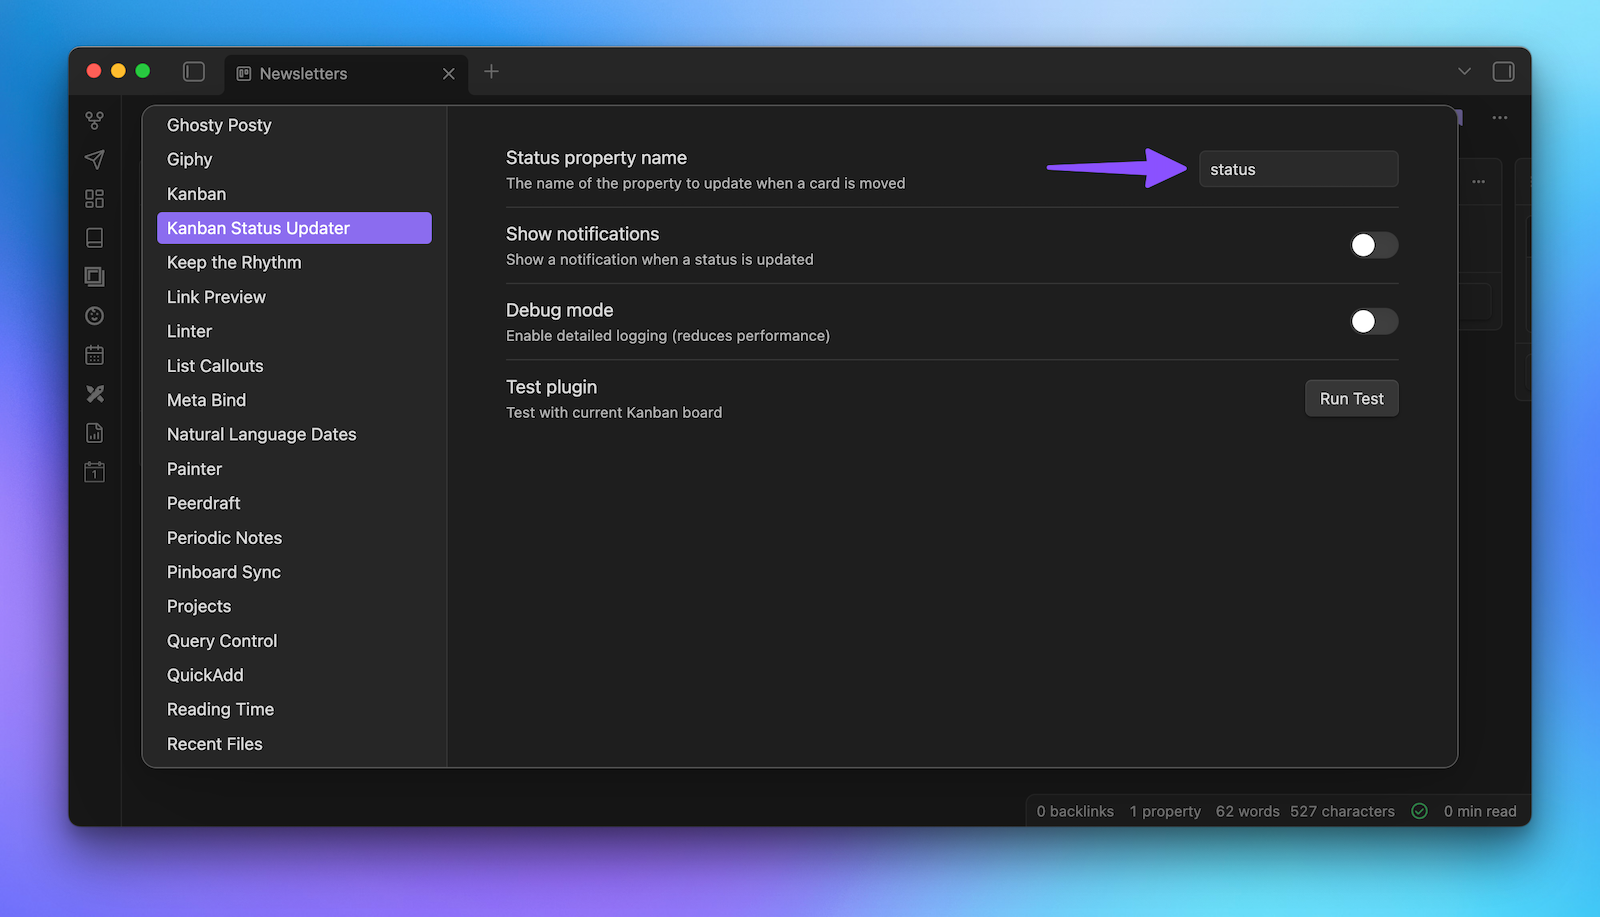
When you have a Kanban board open, you can click the Run Test button to see if things are connected properly, and you should see a notification showing the number of cards the plugin found with the indicated metadata property.
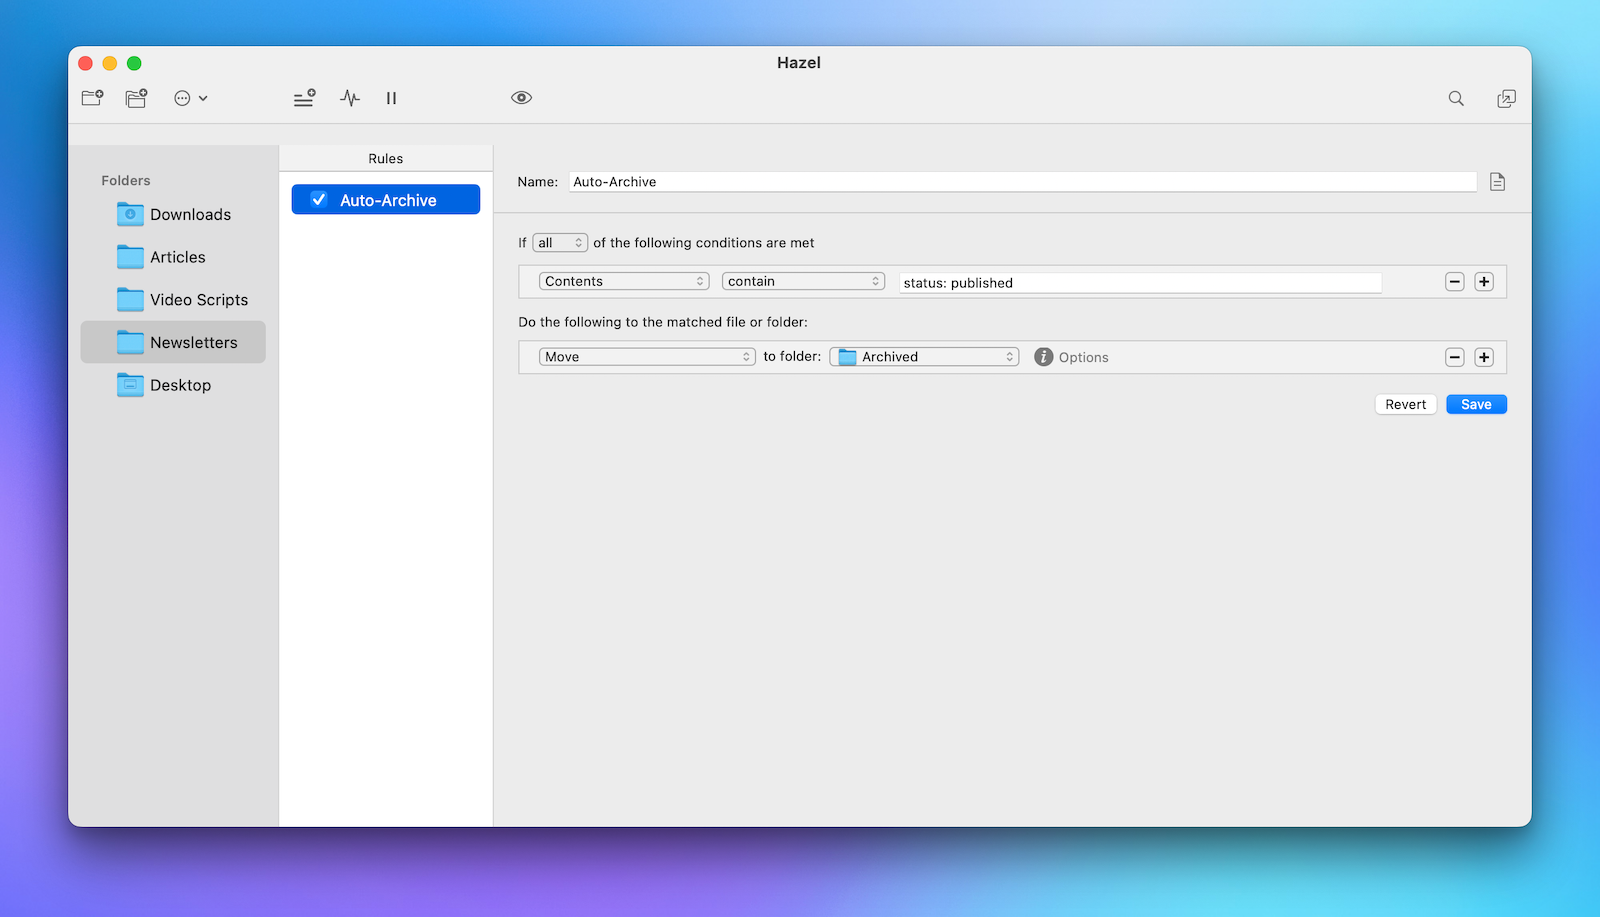
Once it's working, you can then move cards from one column to another, and the status in the linked note will automatically be updated with the name of the column the card was moved to. Because I have a Hazel rule set up that watches my project folders and looks for status: published and then moves the note to a sub-folder named Archived, I can move a card to the Published column in my Kanban board, Hazel can now automatically move the note to the Archived folder.
From here, you can choose for yourself whether you want the cards themselves to automatically archive. I choose not to (at least for now) because I do like seeing what I’ve shipped recently.


